September 29, 2014, 8:48 am
Already six days have passed since Navarathri started. Hope all of you are enjoying the festivities. I had been wanting to post a few recipes for Navarathri, but nothing seemed to work out. Finally I prepared this sundal today.
The pasi paruppu sundal is one of the easiest ones. It does not require any overnight soaking or pressure cooking. It gets ready in a jiffy. The only thing we need to take care about is that the dal should not get overcooked neither should it remain undercooked. It should be cooked just right.
Serves 2
What you'll need
- Pasi Paruppu – ¼ cup
- Turmeric Powder – a pinch
- Scraped Coconut – 2 tbsp
- Ginger – a small piece
- Green Chilly – 1
- Salt to taste
For Tempering
- Coconut oil – 2 tsp
- Mustard Seeds – ½ tsp
- Dried Red Chilly – 1
- Asafoetida – a generous pinch
- Curry Leaves – few
Method
- Dry roast the dal for couple of minutes or until a nice aroma comes. Need not change color.
- Add water and soak for about 10 minutes.
- Drain the water and add about 2 cups of water and bring to boil.
- Add turmeric powder and salt.
- Once it starts boiling, reduce heat to medium low and keep stirring once in a while. Always be near and keep an eye on it as it has a tendency to boil over.
- Cook until soft but not mushy. Strain the water and set aside.
- In the meanwhile, pulse the coconut, ginger and green chilly. They need to get crushed. Do not add water.
- Heat a kadai with oil, temper with mustard seeds, red chilly.
- Add the curry leaves and asafoetida.
- Next add the cooked dal and give a quick stir.
- Finally add the coconut and stir again.
- Remove from heat.
Healthy and delicious sundal is ready.
↧
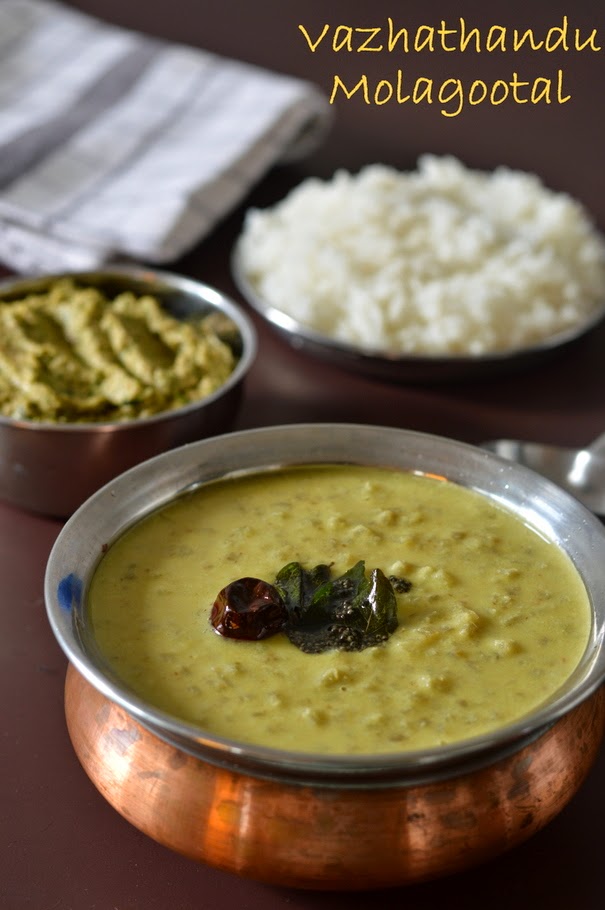
Molagootal is a typical Palakkad Iyer fare. It is a mild lentil and vegetable based dish. The most common vegetables used are Ash Gourd, Yam, Pumpkin and Plantain. It is also prepared using other vegetables like Cabbage, Spinach or other greens and Vazhathandu/Plantain Stem. This version made of vazhathandu/plantain stem is one of my favourites. Pair it with a Thogayl or Pachadi and rice and you have a simple, healthy and very delicious meal.
Serves 3 to 4
What you’ll need
- Vazhathandu/Plantain Stem – 1 medium sized, finely chopped
- Pasi Paruppu – 1/3 cup
- Scraped Coconut - ¾ cup
- Cumin Seeds/Jeera – 1 tsp
- Turmeric Powder – ¼ tsp
- Salt to taste
Roast
- Urad Dal – 1 tsp
- Dried Red Chilly – 1
Tempering
- Mustard Seeds – ½ tsp
- Curry Leaves - few
- Coconut Oil – 2 tsp
Method
- Finely chop the vazhathandu and put in a bowl of water with a spoon of buttermilk/curd until use. I had 3 cups of the chopped vegetable.
- Dry roast the pasi paruppu until a good aroma comes, need not change color. Cool.
- Pressure cook the dal along with the vazhathandu, turmeric powder and salt and 1 to 1.5 cup of water, for 2 to 3 whistles.
- In the meanwhile, heat a small frying pan with a tsp of oil and roast the urad dal and dried red chilly until the dal turn golden.
- Grind this along with the coconut and cumin seeds into a fine paste adding little water.
- After opening the cooker, add this ground coconut paste, mix well add water to adjust the consistency, about 1.5 cup of water, check for salt and bring to boil.
- Once it starts boiling remove from heat.
- Temper with mustard seeds and curry leaves.
Serve with plain rice and a thogayal or pachadi
↧
↧
October 12, 2014, 9:03 am
Time is flying. I know it sounds really cliched, but it feels like yesterday when we were just done with the Navarathri celebrations and now its already time for Diwali. Days have been really very busy and I have not been able to give too much time to my blog. But with Diwali just around the corner, I wanted to post a couple of recipes for the occasion and here is the first one.
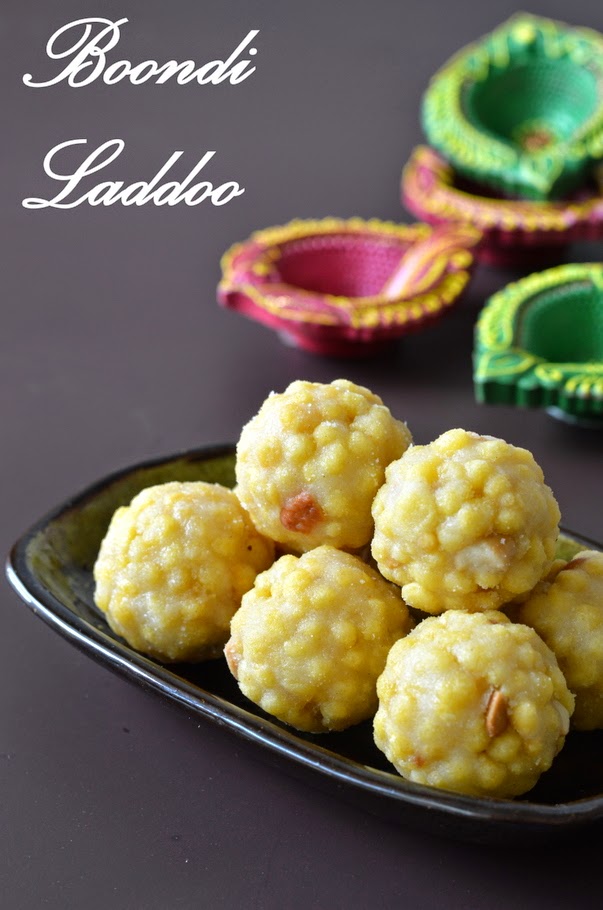
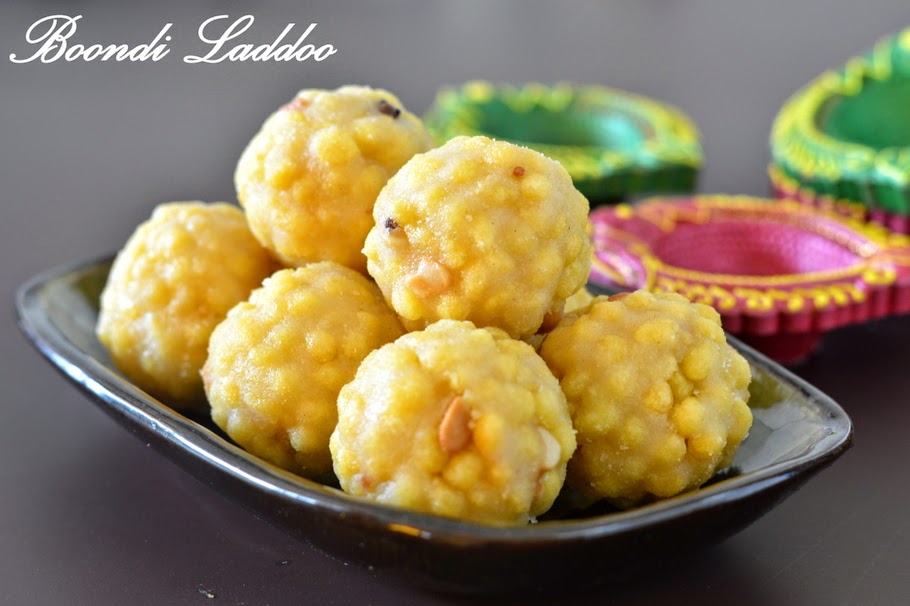
Boondi laddoos are a very popular sweet, be it any occasion. It is fairly simple to make, not much of stirring and wondering whether you reached the correct stage to remove from heat like in the burfis. Though the method may sound daunting, it is quite easy.
Makes about 12 medium sized laddoos
What you'll need
- Gramflour/Kadala Maavu/Besan – 1 cup
- Water – ½ cup to ¾ cup
- Yellow Food Color – few drops (optional)
- Oil for deep frying
- Sugar –1 ½ cup
- Water – ¾ cup
- Ghee – 1 tsp
- Cashewnuts – about 15 broken into small pieces
- Raisins – few
- Whole Green Cardamom – 3 to 4
- Cloves – 3 to 4
Method
- Heat a small frying pan with ghee and fry the cashewnuts, raisins, cloves and cardamom. Keep aside.
- Sieve the gramflour and keep it in a wide mouthed vessel.
- Add water and make smooth batter of pouring consistency (dosa batter). (Refer my Kara Boondi post for detailed recipe and troubleshooting on how to make boondi)
- Add the food color and mix well.
- Pour the oil in a kadai and heat it for deep frying.
- In the meanwhile prepare the sugar syrup,
- Heat a Kadai, add sugar and add water just to immerse the sugar, about ¾ cup.
- Let the sugar dissolve completely and come to a boil. The sugar syrup should reach one string consistency.
- To test for the one string consistency, just take a little syrup between your index finger and thumb, you should see a single thread.
- Give it another boil and switch off the flame.
- To make the boondhis, place one of the perforated ladles, a little above the hot oil, pour a ladle of batter on the ladle, let the batter drop by itself, this gives perfectly round boondhis.
- Fry on medium heat, turning them once or twice in between.
- Fry until 3/4th done, don’t cook till very crisp, scoop out the boondhis and drain on tissue paper.
- Wipe the perforated ladle clean, so as no batter is sticking to it, then repeat the 5 to 7, with the remaining batter.
- Transfer the fried and drained boondhis to the sugar syrup. And mix well. U can transfer the boondhis to sugar syrup after each batch and give a good mix.
- After adding all the boondhis, add the fried nuts, raisins, cloves and cardamom and mix well.
- Let this syrup and boodhi become warm, then make laddoos by taking small amount of the boondis in your hand and form into balls. Set aside to set.
- Delicious laddoos are ready. These stay fresh for minimum 10 days at room temperature.
![]()
Note
- Don’t fry the boondis till very crisp then it becomes difficult to form the laddoos.
- If you feel that there is too much syrup after adding all the boondhis and finding it difficult to shape the laddoos, then just heat the whole thing for couple of minutes and cool and try again.
- You can also add diamond kalkandu, and very little pacha karpooram. I did not add as I didn't have it
↧
October 14, 2014, 8:35 am
Thenkuzhal is one of the easiest murukku varieties and is a must in our house during Diwali and Krishna Jayanthi. It is my kid's favorite too. Usually my mom and MIL prepare the rice flour at home, but I have used the store bought idiyappam flour and it turned out very well.
What you'll need
- Rice Flour/Idiyappam Flour – 2 cup
- Urad Dal Flour – ¼ cup
- Cumin Seeds – 1 tsp
- Hing/Asafoetida – generous pinch
- Butter – ½ tbsp
- Salt to taste
- Oil to deep fry
Method
- In a wide bowl, take the rice flour, urad dal flour, cumin seeds, hing and salt mix well. Also add the butter and mix well so that butter is incorporated in the flours.
- Now add water little by little and knead into a smooth, slightly loose dough.
- Heat a Kadai with oil, for deep frying.
- Get the murukku press ready with the plate with 3 plain holes. Place enough dough in the mururkku press.
- Squeeze in circles on the back of a ladle.
- When the oil is hot enough, test by squeezing a very small piece in the oil, if it floats up immediately then the oil is hot, reduce the flame to medium and slide the squeezed murukkus into the hot oil.
- Fry on medium heat till the bubbles are almost stopped.
- Drain on a tissue paper, cool and store in air tight container.
Notes:
- While squeezing the thenkuzhal, if you see they are getting cut, then the dough might be tight, add a little more water and make it slightly loose.
- Don't add more than the mentioned amount of urad dal flour and butter, that will make the murukku very soft.
↧
October 16, 2014, 12:33 pm
Here is my next sweet for this Diwali. This is really a very easy and simple sweet and get ready very quickly. There was a time a my mother used to prepare this sweet every year for Diwali. This was also one of the first sweets I learnt to prepare. I like to prepare it with the Vanilla essence but you can add even pineapple essence. I have not tried any other flavours. You can add any food color of your choice. I prefer not to add food color. So do try this really easy yet delicious burfi this Diwali.
Yeild – 14 to 15 medium sized pieces
What you'll need
- Maida/All Purpose Flour – ¾ cup
- Sugar – 1 cup
- Ghee, melted – ¼ cup
- Vanilla Essence – few drops
Method
- Grease a tray with ghee and set aside.
- In a Kadai, add the ghee, once ghee is hot, and maida and fry the maida on medium heat for 4 to 5 minutes or until the raw smell of the flour disappears. Take care not to burn the maida. Keep aside.
- Heat a non stick kadai, add the sugar with ¼ cup water and dissolve the sugar. Heat the sugar syrup until the syrup reaches one string consistency. To test consistency, take a drop of the syrup in between your thumb and index finger and gently bring the fingers apart, you should see a single thread of sugar syrup.
- Now, switch off the flame/heat add the essence to the syrup.
- Add the fried maida and keep stirring. Keep stirring continuously till the whole mixture comes together as a mass/ball, took me about 5 minutes.
- Transfer to a greased plate and flatten the top with a butter paper of with the greased bottom of a flat cup like davara.
- Let cool for couple of minutes and then mark the pieces with a sharp knife.
- Cool and remove pieces and store in airtight container.
Notes:
- I added Vanila essence and did not add any color. But you can add any food color of your choice, like yellow color and also change the essence to pineapple or a flavour of your choice. But my personal favourite is Vanilla.
- Mix continuously till the mixture leaves the sides of the kadai and comes together as a mass/ball.
↧
↧
November 16, 2014, 9:55 am
It is almost a month since I last posted and I feel happy to be back to blogging. It was an unexpected break.
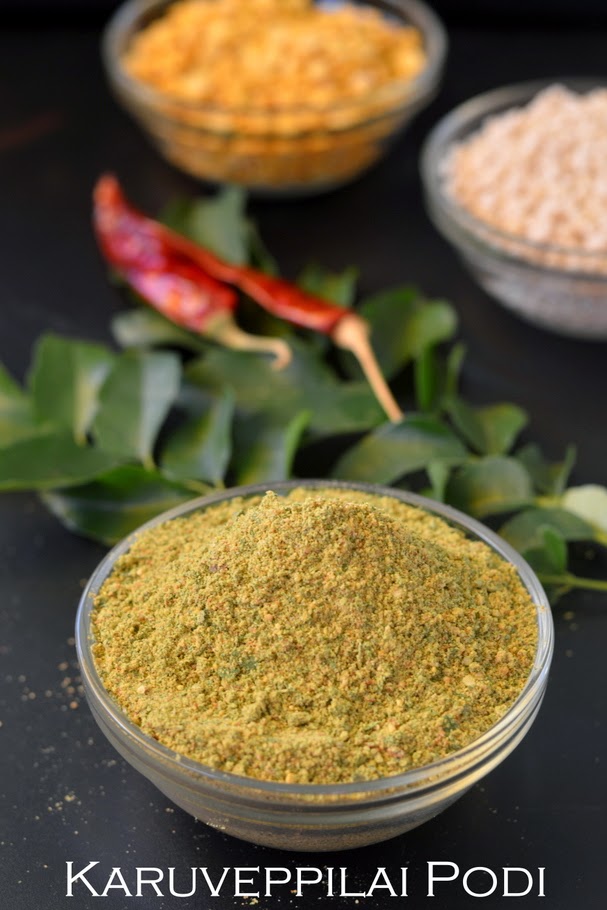
Today I am sharing a very simple post – Karuveppillai podi or Curry Leaves powder. These kind of powders are a staple in my kitchen. They come in very handy, when you don’t have stock of vegetables or are just plain bored or lazy to cook an elaborate meal. Some steamed rice, a spoon of gingely oil and some spice powder like this with some applam or vadams and satisfying meal is ready in no time.
This version I am sharing today is my MIL's version. I have tried another version with other ingredients, will post that recipe also soon.
What you’ll need
- Karuveppillai/ Curry Leaves – 1.5 Cup, tightly packed
- Urad Dal – ¼ cup
- Kadala Paruppu – 2 tbsp
- Dried Red Chillies – 4 to 5
- Cumin Seeds/jeera – 1 tsp
- Whole Black Pepper – 1 tsp
- Asafoetida – a small piece
- Salt to taste
- Oil – 1 tsp
Method
- Wash and drain the curry leaves and then spread on a kitchen towel until the moisture is absorbed.
- Heat a Kadai with a tsp of oil, add the asafoetida and fry till it puffs up.
- Then add the Urad dal and fry until golden. Transfer to a plate.
- Next fry the Kadala paruppu till golden and transfer to a plate.
- Also fry the cumin seeds/jeera and black pepper.
- Switch off the heat and add the curry leaves and keep stirring till the leaves are completely dry and make a crackling sound, the leaves should break when you crush with your hands.
- Cool and grind everything to a fine powder with salt.
- Store in air tight container.
Mix this powder with steamed white rice and a spoon of sesame oil.
Note:
- You can fry a marble sized ball of tamarind along with the dals and grind.
- You can spread the curry leaves on a flat plate and microwave it for 3 to 4 minutes instead of frying in kadai.
- This powder tastes better when on the spicier side, adjust the chillies and pepper accordingly.
↧
November 19, 2014, 2:12 am
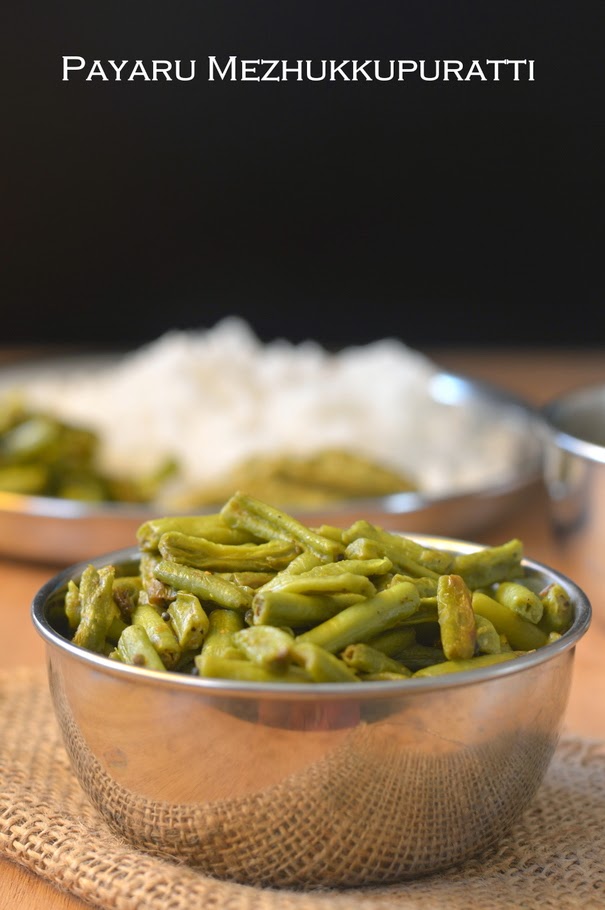
Mezhukkupuratti and moru kootan or rasam is one of my favourite combinations. My kids also like this preparation as it is not spicy. It is very easy to prepare with just a few basic ingredients. But the star of this dish is definitely the aroma of the coconut oil. I have seen some recipes where they use chopped shallots and garlic, but we make it this way, very simple yet flavorful.
What you’ll need
- Karamani/Payaru/Yard Long Beans – 4 cups, chopped into 1 inch pieces
- Turmeric Powder – ¼ tsp
- Black Pepper Powder – ¼ tsp
- Salt to taste
- Coconut Oil – 1 tbsp
Method
- Heat a Kadai with coconut oil, add the chopped payaru.
- Add turmeric powder and salt to taste. Sprinkle little water, cover and cook on medium heat till the vegetables are done. Stir once in a while.
- Remove cover add the black pepper powder and mix well.
- Cook uncovered for another 3 to 4 minutes.
Payaru Mezhukkupuratti is ready.
Serve with Mor kootan or rasam and steamed rice.
↧
November 24, 2014, 1:35 am
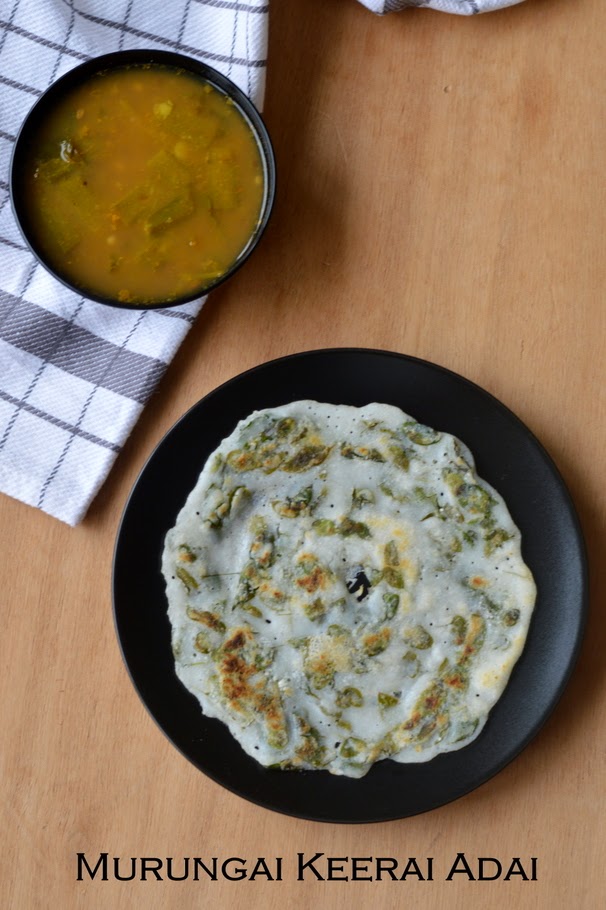
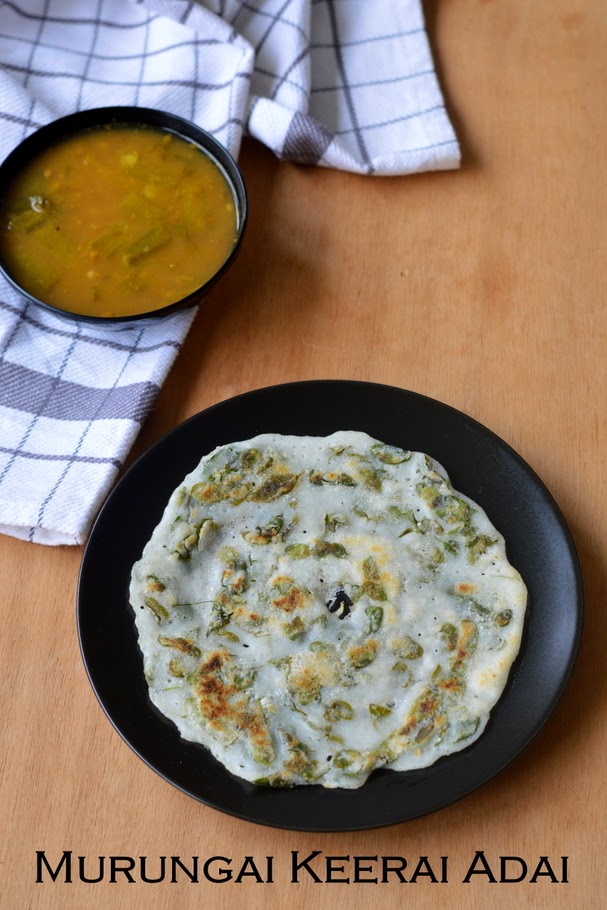
Murungai Keerai/elai or drumstick leaves have a numerous health benefits. You can use it to prepare dishes like Molagootal, thoran or this adai. Cleaning the murungai Keerai definitely is time consuming. Each of the leaves have to be separated from the stem.
Verum Arisi adai can be prepared with many variations. You could add fenugreek seeds, or you could prepare by adding coconut gratings. If you live in parts of the world where you can’t find drumstick leaves easily then you could easily replace it with chopped spinach or methi/fenugreek leaves. Adai with fenugreek leaves is also very flavourful and tastes delicious.
What you’ll need
- Idly Rice/Puzhungal Arisi – 2 cups
- Murungai Elai/Drumstick Leaves – 1 cup, tightly packed
- Salt to taste
- Oil for making the adai
Method
- Soak the idly rice in water for 4 to 5 hours. Drain and grind to a thick smooth paste.
- Add salt to taste and allow it to ferment for 8 to 12 hours.
- Before preparing the adai, add the washed drumstick leaves mix well. Add little water and dilute it. The batter should be of regular adai consistency, not very watery.
- Heat a tava, pour a ladle full of batter and spread into a slightly thick dosa. Make a hole in the middle and drizzle oil along the sides of the adai.
- Cook on medium flame, flip and cook the other side drizzle a spoon of oil. Cook until brown spots appear.
Serve hot with chutney/sambar/molagapodi or even with sugar.
↧
November 27, 2014, 2:34 am
My kids love anything with yogurt. They prefer yogurt to milk any day. No doubt they like raithas and thayir pachadis. And I find it easier to feed them veggies in this form as they eat it without a fuss. So here is a simple yet delicious and wholesome recipe and a great way to sneak in some vazhathandu. We usually prepare Molagootal to go with thayir pachadi, but you can have it with rice and sambar too.
What you’ll need
- Vazhaithandu – 1 cup, finely chopped
- Fresh Thick Curd/Yougurt – 1.5 cup
- Salt to taste
To grind
- Fresh Scraped Coconut – ¼ cup
- Green Chillies – 1 or 2
- Mustard Seeds – 1/8thtsp
For tempering
- Oil – 1 tsp
- Mustard Seeds – ½ tsp
- Curry Leaves – few
Method
- Finely chop the vazhathandu and put in a bowl of water with a spoon of buttermilk/curd until use.
- Drain the vazhathandu pieces from the buttermilk water, squeeze and place in a small vessel. Add salt and toss well. No need to add water.
- Pressure cook it for 3 whistles. I placed it in a small vessel along with the dal and rice. Else you can add little water and cook it on stove top too.
- Grind the coconut, green chillies and mustard seeds. You can add a little of the curds while grinding. Don’t add water.
- Beat the curds well add the ground mixture, cooked vazhathandu and mix well. Check for salt and add accordingly.
- Heat a small frying pan with oil, temper with mustard seeds and curry leaves.
- Pour over the pachadi.
Vazhathandu pachadi is ready. Serve as an accompaniment with steamed rice and Molagootal.
↧
↧
December 2, 2014, 4:38 am
This year Karthigai falls on 5th of December. Karthigai is celebrated by sisters for the welfare of their brothers. Nei Appam, Nel Pori, Aval Pori and Adai are usually prepared and offered as neivedhyam in the evening during Sandhya time. Deepam/Vilakku/Diya are lit and placed all around and inside the house.
In our house we usually don't make urundais/balls of the pori, the pori is just added to the jaggery syrup and mixed well. But I made them into balls so that it is easy to handle for my kids and is less messier. Try to use Paagu vellam or dark colored vellam. I could'nt find it here and so had to make do with the white jaggery that is available.
What you’ll need
- Nel Pori – 4 heaped cups
- Powdered Jaggery – ¾ cup
- Water – ¼ cup
- Coconut – ¼ cup, cut into small pieces
- Cardamom Powder – ¼ tsp
- Dry ginger powder/Chukku Podi – ¼ tsp
- Ghee – to grease hand
Method
- Place the jaggery in a heavy bottomed kadai. Add ¼ cup of water and heat the jaggery on medium flame until the jaggery is dissolved completely.
- Strain the jaggery syrup for impurities.
- Wash the kadai and put it back on heat. Pour the jaggery syrup back into the kadai and heat it on medium flame.
- When the syrup starts boiling and frothing, add the coconut pieces and keep stirring.
- Keep a small bowl with water, once the syrup starts becoming thick, pour 2 to 3 drops of syrup in the water, you should be able to form a ball and when you put that ball on a plate, it should give a sound. This is “kal pagam”.
- Once the syrup reaches the kal pagam, turn off the flame and add the cardamom powder and ginger powder and then add pori to it and mix well.
- Transfer to a plate, grease hands with ghee and take a handful of the pori and press tightly in between the two hands and form a ball. Repeat with remaining pori, while the pori is still warm.
Note:
- The sweetness is just right, you can increase the jaggery to upto 1 cup if you like.
- Make sure the syrup reaches the kal pagam, else the pori will settle at the bottom and become soggy.
↧
Beetroot is a very versatile vegetable and can be used to prepare anything from appetizers to desserts. They are one of the vegetables which liked by all at home. So I am always on the lookout for recipes that using this veggie. The Beetroot Khichadi and Beetroot rice is one of the favorites in our home.
Coming to this thogyal, it is a delicious blend of the hot, sweet and sour. Make sure to use enough red chillies or you may end with a very sweet thogayal. This thogayal, pairs well with rice and rotis. They make a great sandwich spread too. Do try it and and let me know how you enjoyed it.
What you'll need
- Beetroot – 2 cups, grated
- White Whole Urad Dal – 2 tbsp
- Dried Red Chillies – 3 to 4
- Tamarind – 1 inch piece
- Oil – 3 to 4 tsp
- Salt to taste
Method
- Heat a Kadai with a tsp of oil, fry the urad dal on medium flame, until is starts changing color. Now add the red chillies and tamarind piece and fry until the dal turn golden brown.
- Transfer into a plate.
- Add the remaining oil in the kadai, add the grated beetroot and sauté for 5 to 6 minutes. Allow to cool.
- Transfer the dal, tamarind and red chillies to a mixie jar and blend to a coarse powder.
- Now add the sautéed beetroot and grind. Add one or 2 spoons of water if required.
- Add salt to taste and give another pulse.
- Transfer to a bowl. Yummy beetroot thogayal is ready.
Serve as accompaniment with rice and Molagootal or just mix up with rice and enjoy.
Note:
- Adjust the amount of red chillies according to your taste. But this tastes better if slightly on the spicier side as the beets are sweet.
- In the mango season, you can substitute the tamarind with few pieces of raw mango.
- This thogyal can be had as an accompaniment with rotis and also a sandwich spread.
↧
January 19, 2015, 3:01 am
Thoran is a dry vegetable dish prepared with a variety of vegetables like beans, carrot, cabbage, beetroot etc. Whenever I get vazhakkai I prefer to make the mezhukkupuratti along with chenai. After a long time I prepared this thoran and we all loved it. It pairs well with Sambar, Rasam and Moru Kootan. I personally love it with Rasam.
What you'll need
- Vazhakkai/Plantain/Raw Banana – 4 small
- Turmeric Powder – ¼ tsp
- Salt to taste
- Coconut oil – 2 tbsp
- Mustard Seeds – ½ tsp
- White Urad dal/Ulutham Paruppu – 1 tsp
- Curry Leaves – few
Coarse Grind
- Green Chillies – 1 or 2
- Fresh Scraped Coconut – ½ cup
Method
- Peel the skin of the raw banana and chop them into small cubes. Keep the pieces immersed in a bowl with water and few spoons of buttermilk until use.
- Heat a Kadai with oil. Add mustard seeds, once they splutter add the urad dal and fry till the dal turns golden, now add the curry leaves and the drained raw banana pieces.
- Add turmeric powder and salt to taste. Add about ½ cup of water, cover with lid and cook on medium flame.
- Keep stirring once in a while to avoid burning.
- In the meanwhile, coarsely grind the coconut and green chillies. Do not add water.
- Once the vegetables are done, remove lid and roast on medium flame for another 3 to 4 minutes.
- Now add the crushed coconut and green chilly mix and mix well. Fry for a couple of minutes.
- Remove from heat and serve hot with sambar/rasam or moru kootan.
↧
January 27, 2015, 3:00 am
It has been really cold the past week here. What better way to enjoy the chilly days with a comfort food of rasam, rice and pappadam. Rasam is an all time favourite at our home. My younger one likes to drink it as such. This Jeera rasam is one of her favourites.
This is a very simple rasam with no addition of even dal. Just a few regular ingredients and you have a hearty rasam ready in minutes. This rasam is great on the days when you are down with fever, cold or cough. The black pepper and cumin have a soothing effect.
What you’ll need
- Tamarind – gooseberry sized ball
- Pepper Powder – ½ - 1 tsp
- Jeera Powder – 1.5 tsp
- Turmeric Powder – ¼ tsp
- Salt to taste
- Curry Leaves – few springs
For tempering
- Ghee – 1 tsp
- Mustard Seeds – ½ tsp
- Jeera – ½ tsp
Method
- Soak the tamarind in 1 cup of hot water for 10 to 15 minutes
- Squeeze and take out the extract. Add about 2 cups of water to this and transfer it to a vessel.
- Now add the turmeric powder, pepper powder, and salt to taste. Also tear a few curry leaves and add it.
- Now bring this to a boil. Let it boil for 6 to 8 minutes now add the jeera powder and around a cup more of water.
- Simmer until the rasam starts frothing.
- Remove from heat.
- Heat a small frying pan with ghee, add the mustard seeds and cumin seeds. Pour the tempering over the rasam. Cover and rest it for few minutes before serving. The resting time is for the flavours to mingle well.
Serve hot with rice and vazhakkai Chenai mezhukkuperatti or drink it as it is.
↧
↧
February 2, 2015, 1:31 am
I am a great fan of pickles and thokku varieties, especially the Grand sweets and Snacks ones. Back in India I used to get them frequently. I also carried a couple of bottles while travelling to Amsterdam. But alas, they didn’t last me very long. Now, I was left with no other option other than trying it in my kitchen.
I remembered having a homemade version of the kothamalli thokku at one of my aunt’s place. I checked with her for the recipe. Infact she had learnt it from her MIL. So here is her version of the Kothamalli thokku. I was very pleased with the result.
It is a great accompaniment with curd rice, parathas or even as a sandwich spread. You could also simply mix a portion of the thokku with steaming hot rice. It tastes great.
Makes a small cup
What you’ll need
- Fresh Coriander Leaves – 2 Big bunches, (approx 2 cups tightly packed) only leaves and tender stems
- Dried Red Chillies – 5 or 6
- Tamarind – a small gooseberry sized ball
- Asafoetida – a generous pinch
- Jaggery – 1 tsp
- Salt to taste
- Mustard Seeds – ½ tsp
- Gingely oil/Nalla Ennai – 3 to 4 tbsp
Method
- Wash and clean the coriander leaves. Discard the hard and mature stem. Roughly chop and keep aside.
- Heat a kadai with a spoon of oil and fry the red chillies, tamarind and asafoetida.
- Grind the red chillies and tamarind and then add the chopped coriander leaves to the mixie jar and grind. Add very little water and grind to a smooth paste.
- Heat a kadai and add the remaining oil, once the oil is hot, add the mustard seeds.
- Once the mustard splutters add the ground coriander paste, salt and jaggery and sauté till the oil leaves the sides of the kadai.
↧
February 17, 2015, 12:57 am
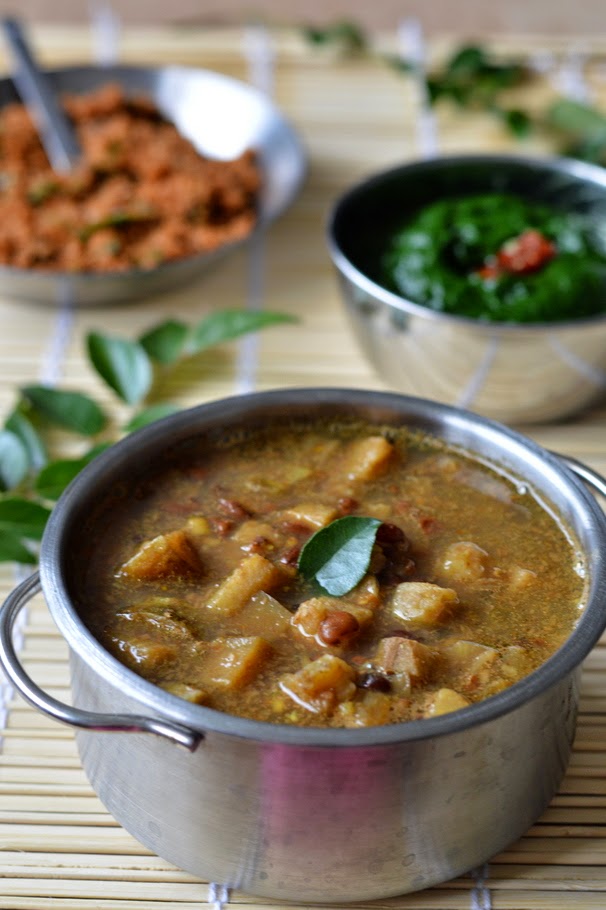
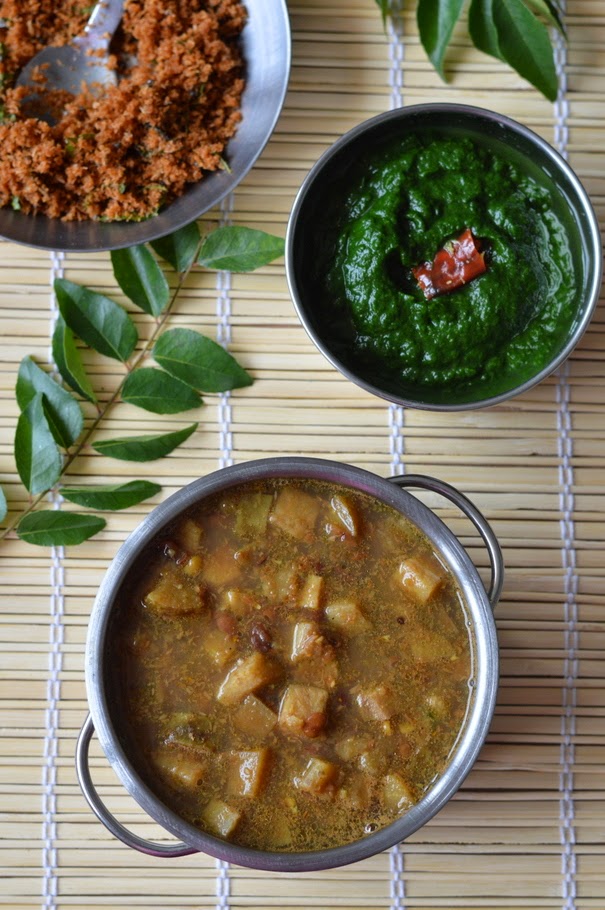
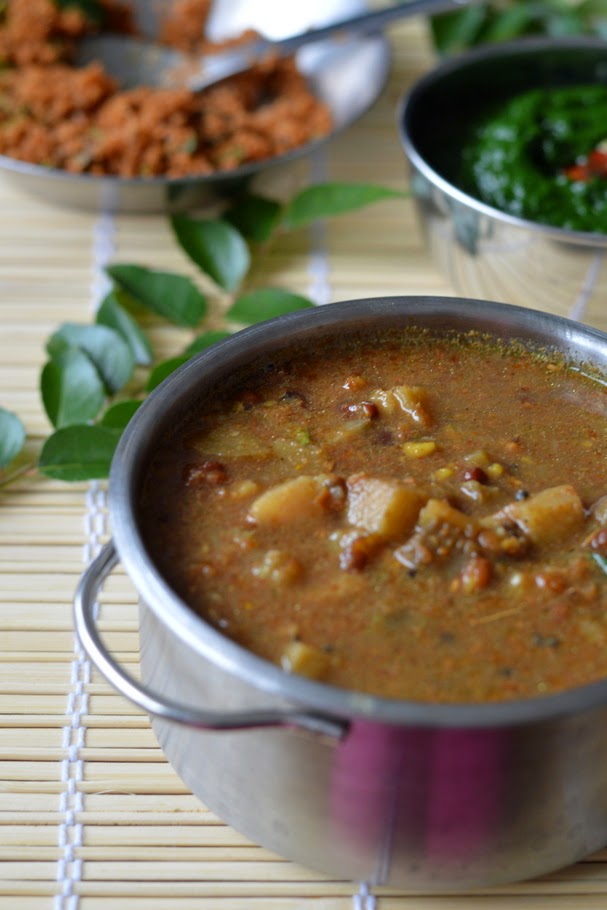
Poricha kuzhambu is a tamarind based kuzhambu with lot of vegetables. I have already posted a couple of variations of this kuzhambu. Today's version is yet another variation. It doesn't have any ground masalas. Yet it is very flavorful and delicious. I learnt it recently from my MIL. I have made this a couple of times now and all at home including my kids liked it very much. Don't be scared by the number of ingredients. They are all very basic ingredients that are easily available in your kitchen. This kuzhambu has a lot of vegetables, which is its speciality and so a simple Keerai masiyal or paruppu thogayal would be a great accompaniment with this.
What you’ll need
- Karamani/Red Chowri Beans – ½ cup
- Raw Banana/Vazhakkai – ¾ cup, peeled and chopped into small cubes
- Yam/Chenai- ¾ cup, peeled and chopped into small cubes
- Brinjal – ¾ cup, chopped into small cubes
- Tamarind – gooseberry sized
- Chilly Powder – ½ tsp
- Black Pepper Powder – ½ tsp
- Turmeric Powder – ¼ tsp
- Asafoetida – a generous pinch
- Scraped Coconut – ¼ cup
- Jaggery – 1 tsp
For tempering
- Coconut oil – 1 tsp
- Mustard Seeds – ½ tsp
- Cumin Seeds – ½ tsp
- Curry Leaves – few sprigs
Method
- Soak the karamani in hot water for about 15 to 20 minutes. Then pressure cook it with sufficient water for 3 to 4 whistles or till the beans are soft. Once cool, mash the beans and set aside.
- Also steam or pressure cook the vazhakkai and chenai pieces with about a cup of water.
- Soak the tamarind in a cup of hot water for 10 minutes. Squeeze and extract the juice.
- Transfer the tamarind extract to a vessel, add the brinjal pieces, turmeric powder, asafoetida, chilly powder, pepper powder, and jaggery and bring to a boil.
- When the brinjal is almost cooked, add the vazhakkai and chenai pieces, the cooked red beans and salt to taste. Boil for 3 to 4 minutes. Remove from heat.
- In a small kadai, add some coconut oil, and roast the coconut till the color changes to dark brown. Take care not to burn the coconut.
- Add the roasted coconut to the kuzhambu and mix well.
- Heat a small frying pan, with a tsp of oil, temper with mustard seeds, cumin seeds and curry leaves. Pour the tempering over the kuzhambu.
Serve hot with steamed rice and Keerai Masiyal or Paruppu Thogayal.
Note:- While taking the tamarind extract use only 1 to 1.5 cups of water. Also while cooking the vegetables and the Karamani, don't use more than 1 cup each. Else the kuzhambu will become too watery.
- If you have feel there is too much water in the beans or vegetables, reserve some of the water before adding to kuzhambu and add if necessary.
↧
February 23, 2015, 2:52 am
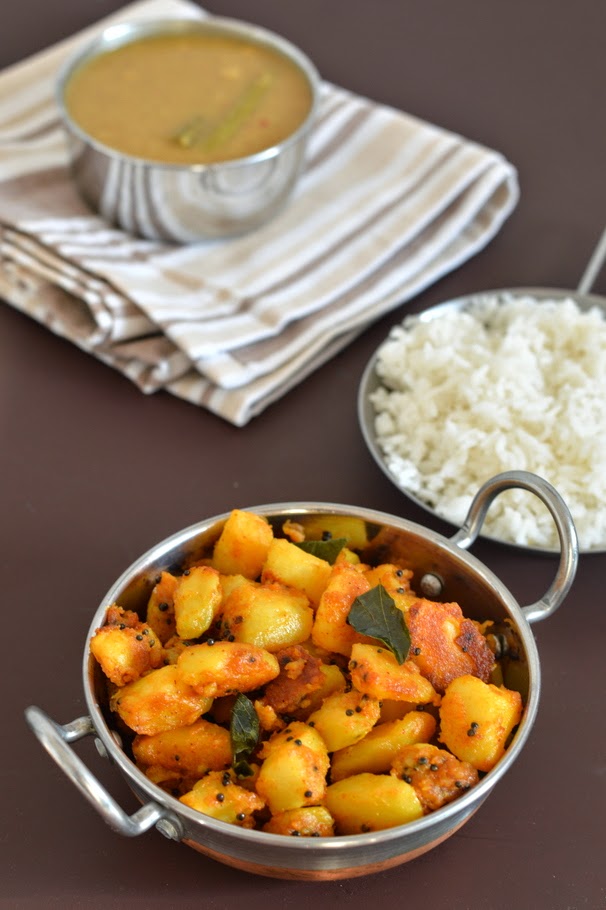
Potato is one vegetable which is like by adults and kids alike. It is a favourite at our home too. While going through the posts on my blog the other day, I realized I haven’t posted our family’s most loved curry. And so, this weekend I decided to cook and click this all time favourite of many.
The recipe is very simple, anybody can prepare it. You can add sliced onions too in this, though I have not added this time. A meal of rice, Vengaya sambar and potato curry is bliss. So here is my potato curry.
Serves 3 to 4
What you’ll need
- Potatoes – 5 to 6 Medium Sized
- Turmeric Powder – ¼ tsp
- Sambar Powder – 1 to 2 tbsp
- Red Chilly Powder – ½ tsp
- Asafoetida – a generous pinch
- Salt to taste
For tempering
- Oil – 2 tbsp
- Mustard Seeds – ½ tsp
- Urad Dal – 1 tsp
- Channa dal – 1 tsp
- Curry Leaves – few
Method
- Wash the potatoes well and cut them into half or quarters.
- Pressure cook the potatoes with some water for 2 whistles. Don’t overcook.
- Once the cooker cools, open, and let the potatoes cool down well.
- Remove skin, and cut into smaller pieces.
- Heat a non stick pan with oil, temper with mustard seeds, once they crackle, add the channa dal and urad dal fry till the color of the dals turn golden. Add the curry leaves.
- Add the potatoes, turmeric powder, asafoetida and salt to taste and mix gently.
- Let this roast for few minutes, keep stirring once in a while.
- Now add the red chilly powder and sambar powder, adjust the quantities according to taste.
- Stir well and roast for few more minutes.
Serve hot with rice and sambar or rasam.
Note:
- Don’t overcook the potatoes; else the curry would be completely mashed.
- If adding onions, add after the tempering and sauté for a few minutes before adding the potatoes.
- Always add the chilly powder and Sambar powder towards the end, else, this keeps the aroma of the sambar powder intact without burning the masala too much.
↧
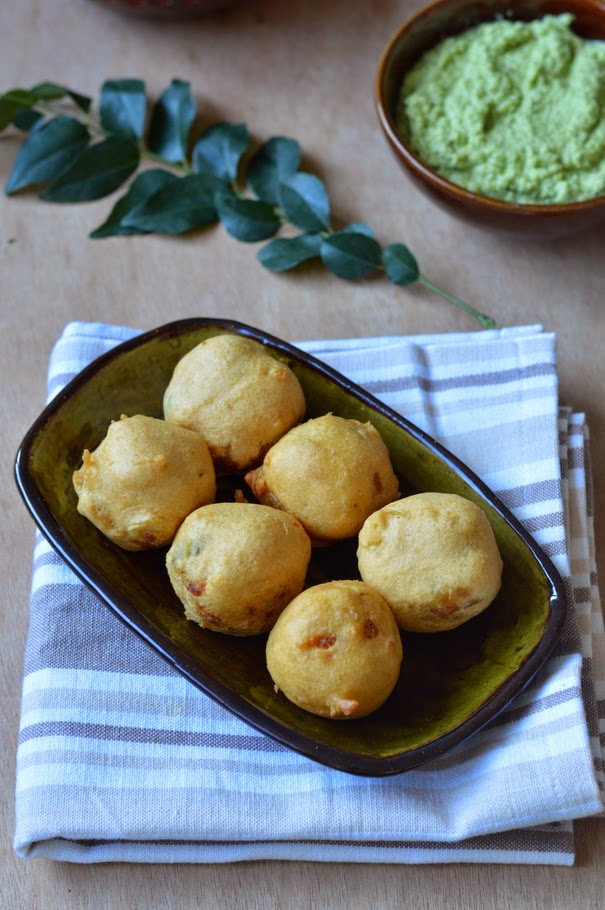
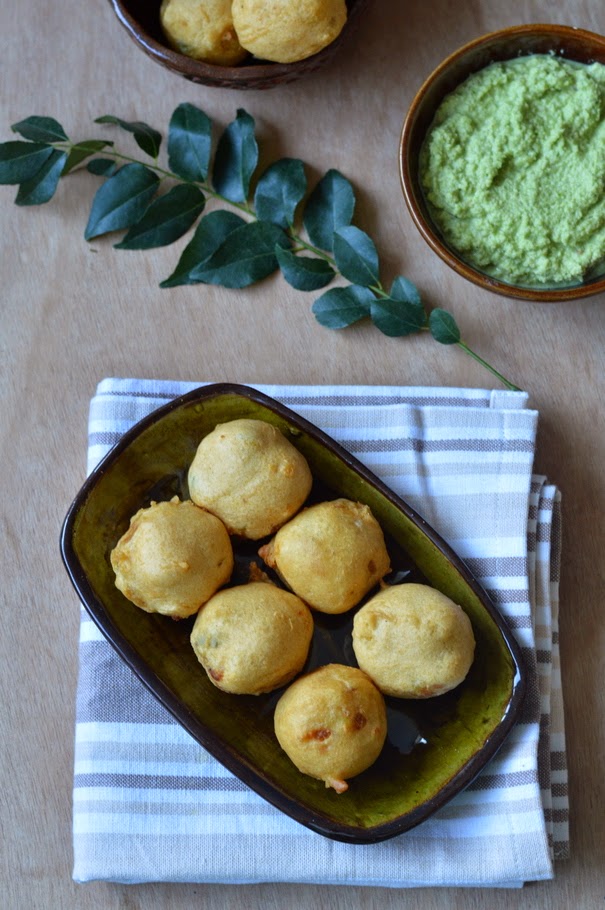
The weather in Amsterdam, on any day is perfect for some hot coffee and fried snack. Though I love all the different varieties of bajjis, bondas and vadais, I hardly prepare them. It has been a really long time since I prepared any snack. And this weekend, I decided to prepare something.
This post is dedicated to a special person, who loves these kind of snacks. Writing this post, brought back lot of fond memories of the times we spent together.
What you’ll need
Serves 4
For the filling
- Potatoes – 4 big
- Onion – 1 big
- Green Chillies - 3 to 4
- Ginger – a small piece
- Curry Leaves – few leaves
- Lemon juice – 1 tsp
- Turmeric Powder - 1/4 tsp
- Salt to taste
For tempering
- Oil – 2 tbsp
- Mustard Seeds – ½ tsp
- Bengal Gram Dal/Kadala Paruppu – 1 tsp
- Urad Dal/Ulutham Paruppu – 1 tsp
For outer Covering
- Besan/Kadala Maavu – 1 cup
- Rice Flour – ½ cup
- Red Chilly Powder – 1 tsp
- Asafoetida - a generous pinch
- Baking soda – a pinch
- Salt to taste
Oil for deep frying
Method
- Wash the potatoes and cut them into quarters. Pressure cook the potatoes for 3 whistles.
- Peel and crumble the potatoes roughly. Keep aside.
- Heat a Kadai with 2 tbsp oil, temper with mustard seeds, once they crackle, add the kadala paruppu and ulutham paruppu and fry till the dals turn golden.
- Now add the chopped green chillies, grated ginger and curry leaves. Saute for few seconds and then add the finely chopped onions and turmeric powder.
- Fry till the onions turn translucent. Now add the crumbled potatoes and salt to taste. Mix well.
- Remove from heat and drizzle the lemon juice. Mix well.
- Allow to cool, and make small lemon sized balls of the potato mixture and set aside.
- In the meanwhile, place a kadai with oil for deep frying on heat.
- Now prepare the batter for the outer covering,
- In a wide bowl, take the besan and rice flour, add salt, chilly powder, asafoetida powder and baking soda, mix well. Add water little by little and whisk well to make a smooth batter which is not to thick or not too runny. It should be of coating consistency. Check for seasoning and add if required.
- Now dip the potato balls one at a time in the batter so as to nicely coat the balls and deep fry them in oil. Fry them on medium flame, flipping the bondas once in a while so that they are cooked evenly on all sides. Fry till the bubbles have almost stopped.
- Drain on a tissue paper. Repeat with remaining potato balls.
![]()
Serve hot with coconut chutney and a hot cup of coffee.
↧
↧
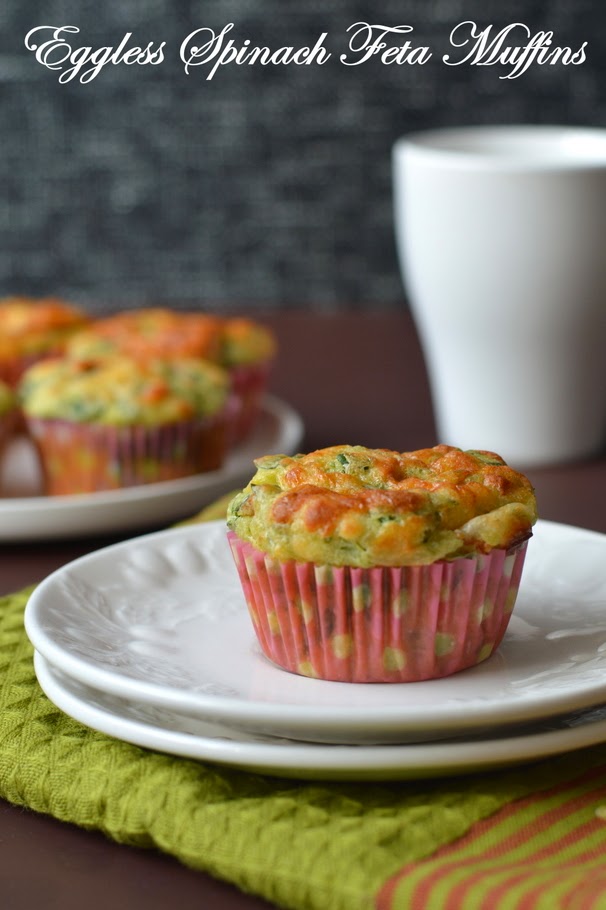
It has been a long time since I posted any bakes here. This time when Priya suggested Savory bakes for the HomeBaker’s Challenge, I didn’t want to miss it. I love trying out savory bakes and these spinach and feta muffins were simply delicious. The next time I would surely like to add in some spicy kick to these muffins by adding some ground green chillies. They taste great immediately out of the oven, but were equally good on warming in the microwave for a minute the next day.
Makes - around 18 muffins
What you’ll need
- Maida/All Purpose Flour – 2.5 cups
- Spinach Leaves – 2 cups, finely chopped
- Feta Cheese – ¾ cup, crumbled
- Tomatoes – ¾ cup, finely chopped
- Baking Powder – 2 tsp
- Salt – 1 tsp
- Milk – 1 1/3 cup at room temperature
- Buttter – 6 tbsp
- Plain Curd/Yogurt – 3 tbsp at room temperature
- 2 tbsp of mozzarella
Method
- Pre-heat oven to 200C. Line a muffin tray with liners and set aside.
- In a wide bowl, add the all purpose flour, salt, baking powder and mix well.
- Next add the chopped spinach leaves, feta, tomatoes and mix well.
- Melt the butter in the microwave. To this add the milk and curd and whisk well.
- Pour this mixture to the other spinach flour mixture and combine well.
- Spoon the batter into the lined muffin tray until ¾ filled. Top with grated mozzarella.
- Bake for around 20 minutes or until the top turn golden brown. Insert a toothpick and make sure there is no unbaked dough.
- Remove and cool.
Serve warm.
↧
Idly and dosa are the most common breakfast or tiffin items in a south Indian household, and it is no different at my home as well. Once I grind the batter for idly/dosa, I feel as if a big task is done – the task of thinking what to prepare for dinner. Yes we usually have it for dinner. Though the main item is gets decided, but what do you serve it with? I usually end up making either the coconut chutney, tomato chutney or Sambar. This Tiffin Sambar is loved by all at home and my kids end up eating an extra idly or dosa. What more can I ask for?
The recipe for this sambar is quite similar to the Archuvitta Sambar, with a few extra ingredients in the spice paste. Also the amount of tamarind used is very little in this. The slight variations in the spice mix, does give a very different flavour to the Sambar and makes it perfect as a side dish for idly/Dosa or Pongal. In the recipe I have mentioned cooking a few pieces of pumpkin along with the dal. I learnt this from one of the TV shows, and it gives that very slight sweetness, which balances all the flavours. It also gives a little thickness to the sambar. If you don’t have pumpkin, or forget to cook along with dal, use a tsp of powdered jaggery.
What you’ll need
Serves – 4
- Tuar Dal – 1/3 cup
- Tomatoes – 2 big
- Chinna Vengayam – 10 or replace with 1 – medium sized onion
- Pumpkin – ½ cup, chopped into cubes
- Vegetables of your choice – like Carrots, potatoes, and drumstick. I used only drumstick
- Tamarind – a marble sized ball
- Turmeric Powder – ¼ tsp
- Asafoetida Powder – a generous pinch
- Salt to taste
- Curry Leaves – few
- Coriander Leaves – a few sprigs
To roast and grind
- Coriander Seeds – 2 tbsp
- Channa Dal/Kadala Paruppu – ½ tbsp
- Urad Dal/Ulutham Paruppu – ½ tbsp
- Cumin Seeds/Jeeragam – 1 tsp
- Dry Red Chillies – 3 to 4
- Coconut – 2 tbsp
For tempering
- Coconut Oil – 1 tbsp
- Mustard Seeds – ½ tsp
Method
- Pressure cook the dal along with the pumpkin pieces, little turmeric powder and a spoon of oil. Once cooked, mash well and keep aside.
- Soak the tamarind in a cup of hot water. Squeeze and extract the juice and keep aside.
- Heat a heavy bottomed vessel with oil, add mustard seeds, once it splutters, add curry leaves.
- Next add the chopped onions and sauté a few minutes, until the onions turn translucent.
- Now add the chopped tomatoes and sauté until it turns mushy.
- Add the tamarind extract along with the vegetables, turmeric powder, asafoetida, salt to taste. Also add another cup of water.
- Let this boil until the raw smell of the tamarind disappears, for about 7 to 8 minutes.
- In the meanwhile, heat a small pan, with a tsp of oil, add the Kadala paruppu and roast, for a minute, next add the ulutham paruppu, and fry, once the dals start changing color, add the coriander seeds, cumin seeds and red chillies. Lastly, add the coconut and fry on till the coconut changes to a light brown color. Do the entire frying on a low to medium heat. Take care not to burn any of the ingredients else the entire taste of the sambar will change.
- Grind this into a fine paste using a little water.
- Once the vegetables are cooked and the raw smell disappears, add the mashed dal and let it for 2 to 3 minutes, finally add the ground paste, add some water to adjust the consistency. Let it come to a boil.
- Garnish with coriander leaves.
Remove from heat, cover and keep until use.
Serve hot as an accompaniment with idly/dosa/Pongal. Drizzle some melted ghee on top of the Sambar before serving.
Note:
- Use vegetables of your choice, like mentioned above, carrots, potatoes, drumstick. But don’t use too much. I personally prefer drumstick as it gives a good flavour.
- Prepare the sambar at least 2 to 3 hours before serving to allow all the flavours to mingle well.
- If you miss out on the pumpkin, don’t miss the jaggery.
- Also a drizzle of ghee before serving enhances the taste and flavour a lot.
↧
Paruppu Urundai Kuzhambu or Uruandai kuzhambu is a tangy tamarind based gravy with lentil balls. This is one of my favorite kuzhambus, though it gets made only very rarely. (that is when I have no stock of vegetables). I have seen so many recipes for this kuzhambu, some with onions, some with ground coconut and even some with coconut milk. The recipe I am sharing today is my mother’s recipe. It is a no onion no garlic recipe and does not make use of coconut also. But still it comes out very delicious.
Some steam the urundais/balls in idly plates and then add them to the kuzhambu at the end, but somehow I have got used to adding the balls directly into the kuzhambu. Follow the method given below and I am sure you will get the perfect kuzhambu. I made it after a long time on this weekend and we all enjoyed it.
What you’ll need
Serves – 2 to 3
Makes around 8 small urundais
For the Paruppu Urundai
- Tuar Dal – 2/3 cup
- Dried Red Chillies – 2 or 3
- Asafoetida – a generous pinch
- Curry Leaves few
- Rice flour – 2 tsp
For the Kuzhambu
- Tamarind – a big gooseberry sized ball
- Sambar Powder – 1.5 tbsp
- Turmeric Powder – ¼ tsp
- Jaggery – 1 tsp (optional)
- Salt to taste
- Coriander Leaves - few for garnishing
For Tempering
- Gingely oil/Nalla Ennai – 1.5 tbsp
- Mustard Seeds – ½ tsp
- Jeera – ½ tsp
- Fenugreek Seeds – ¼ tsp
- Channa Dal – 1 tsp
- Curry Leaves – few
Method
- Soak the tuar dal and red chillies in water for 1 hour. Drain the water completely and grind coarsely along with salt, asafetida and few curry leaves. Do not add water while grinding.
- Soak the tamarind in a cup of hot water for 10 to 15 minutes. Squeeze and take out the extract. Keep aside.
- Heat a Kadai or heavy bottomed vessel with oil, temper with mustard, jeera, channa dal, methi seeds and fry till dal turn golden.
- Add curry leaves, lower the flame and add the sambar powder, fry it for about 30 secs. Take care not to burn it.
- Now add the tamarind extract, along with 2 cups of water, turmeric powder, salt, asafetida and jaggery.
- Let this come to a boil, and let it boil for 3 to 4 minutes.
- In the meanwhile, make small balls from the ground dal paste, dredge it in riceflour and carefully add the balls one by one into the boiling kuzhambu. Reduce the heat to low while adding the balls.
- After you add the balls, don’t stir the kuzhambu. Once the balls are cooked, they will float on the kuzhambu.
- Garnish with coriander leaves and remove from flame. Keep covered until serving. Tastes best after a couple of hours.
That’s it, delicious urundai kuzhambu is ready. Serve with hot rice and a poriyal of your choice.
Notes:
- The tamarind water should be dilute, that is around 3 cups or little more, cos after adding the balls, the kuzhambu will become thicker.
- Don’t add any water while grinding the dals.
- Remember to lower the flame before adding the balls, add them gently one by one.
- Don’t stir the kuzhambu after adding the balls, until they float up.
- You can sauté a sliced onion after tempering and then add the tamarind extract.
- You could also add some fennel seeds/sompu in the dal mixture while grinding. It gives a good flavor.
↧