Quantcast
Channel: Palakkad Chamayal
Viewing all 86 articles
Browse latest View live

Puli Inji

$
0
0


Puli Inji is tangy spicy condiment in which the main ingredients are ginger, green chillies and tamarind. It is one of the main items served in a sadhya along with the pickles. It can be stored for 20 days when refrigerated and handled with care. 

Puli inji is one of my favorite items on the sadhya menu. Though it is a delicacy prepared during a feast, but really, you don't need any special occasion to prepare this. Puli Inji pairs beautifully with molagootal and curd rice. 

The Puli Inji recipe, differs from region to region and family to family. This is the way both my mother and MIL prepare. Do try and let me know. Check out my Sadhya Recipes page for more recipes.


What you'll need
Makes one small cup
  1. Ginger – ¼ cup, very finely chopped
  2. Green Chillies – 8 to 10
  3. Tamarind – a lemon sized ball
  4. Jaggery – same amount as tamarind
  5. Turmeric Powder – ¼ tsp
  6. Salt to taste
  7. Gingely Oil/Nalla Ennai – 3 tbsp
  8. Mustard Seeds – 1 tsp
  9. Asafoetida – a generous pinch
  10. Curry Leaves – few torn

Method
  1. Soak the tamarind in a cup of hot water for 15 to 20 minutes. Squeeze and extract the juice and keep aside.
  2. Wash and peel the ginger, chop it very finely. Also finely chop the green chillies.
  3. Heat a heavy bottomed kadai with oil, temper with mustard seeds, once it crackles, add the curry leaves.
  4. Now add the chopped ginger, and green chillies, and fry it on medium flame. Keep stirring.
  5. Fry till the ginger turns golden brown. Take care not to burn the ginger else the whole taste will change.
  6. Now add the tamarind juice, turmeric powder, asafetida powder, and salt to taste.
  7. Let this boil for 3 to 4 minutes on medium flame. Now add the jaggery and allow to boil till the oil starts floating on top and the consistency becomes thick and saucy.
  8. Remove from heat and let it cool. Serve as an accompaniment with curd rice.


Chakka Pradhaman - Vishu Sadya

$
0
0


I am really happy to be sharing my 400th post with you all. My  blogging journey so far has been a very memorable one. It has been almost 4 years now since I started blogging. It wouldn't have been possible without all you wonderful readers, friends and family. So a big Thank you to one and all. A special thanks to the readers who take the time to leave their valuble feedback here. But for the sweet and encouraging words from you readers, I couldn't have come this far.

Now to today's recipe, Chakka Pradhaman is a very delicious and easy payasam that is usually prepared for Vishu Sadhya as Chakka/Jackfruit are in season during this time. You can prepare the Pradhaman using fresh fruit or prepare it with Chakka Varatti or Jackfruit Preserve. Here, I am sharing the recipe of Chakka Pradhaman using Chakka Varatti.


What you'll need
Serves 3 - 4
  1. Chakka Varatti - 1 cup, tightly packed
  2. Jaggery - 1/4 cup, powdered
  3. Thin Coconut Milk - 1.5 cup* (See Notes)
  4. Thick Coconut Milk - 1/2 cup*
  5. Dry Ginger Powder - 1/2 tsp
  6. Coconut - 2 tbsp, cut into small pieces
  7. Ghee - 1 tbsp
Method
  1. Dissolve the jaggery in 1/2 cup of water and strain for impurities.
  2. Bring this jaggery syrup to a boil. Let it boil for 3 to 4 minutes on medium flame.
  3. Add the chakka varatti to this jaggery syrup and let mix it well, until the varatti dissolves and mixes well with the syrup. 
  4. Now add the thin coconut milk and let everything boil for 6 to 7 minutes.
  5. Remove from heat and add the thick coconut milk. Mix well. 
  6. Add the dry ginger powder and mix.
  7. Heat a small frying pan with ghee and fry the coconut pieces till they turn brown.
  8. Add this to the pradhaman.
Delicious Chakka Pradhaman is ready.
Serve warm.


Note:
  1. I used readymade canned coconut milk. For the thin coconut milk, I took 1/2 cup of the readymade milk and added 1 cup of water to it, that made 1.5 cup of thin coconut milk.
  2. If you are using refrigerated chakka varatti, keep it outside for 2 to 3 hours before preparing the pradhaman. 
  3. Also, if using store bought varatti, check for fibres from the fruit in the varatti. If you feel that the varatti has fibres, you can add the varatti to the thin coconut milk and squeeze the varatti with your hands and remove the fibres. Then add this varatti and coconut milk mixture to the boiling jaggery syrup.
  4. Add and adjust the quantity of jaggery depending on the sweetness of the varatti.
  5. You can also fry cashewnuts and raisins along with coconut pieces if you like.
  6. Cardamom is usually not added to this Pradhaman as it will overpower the flavor of jackfruit.


Baby Potato Podi Curry

$
0
0


Yet again a Potato Post. Potatoes are a favorite at home and loved by all. But somehow I always keep away from cooking them too ofter. I usually end up making a potato curry only as a last resort, that is when I have no other vegetable. But, now, I have to give in to the demands of H and kids and end up preparing potatoes more often and that's the reason for a flooding of potatoe recipes on the blog. :) 
 This preparation with freshly ground spices is  very flavorful, but is on the spicier side. So adjust the chillies and black pepper according to your taste buds. It goes very well with Sambar rice or with just Rasam and rice. I served it along with Sambar Rice.


What you'll need

  1. Baby Potatoes - 3/4 Kg
  2. Turmeric Powder - 1/4 tsp
  3. Asafoetida - a generous pinch
  4. Salt to taste


To Roast and Grind

  1. Channa Dal/Kadala Paruppu - 2 tbsp
  2. Coriander Seeds - 1.5 tbsp
  3. Dried Red Chillies - 3 to 4 (Increase or decrease according to your taste and spiciness of the chillies)
  4. Black Pepper - 1/2 tsp
  5. Coconut - 1 tbsp


For Tempering

  1. Oil - 2 tbsp
  2. Mustard Seeds - 1/2 tsp
  3. Urad Dal - 1 tsp
  4. Curry Leaves - few


Method

  1. Wash and pressure cook the baby potatoes. Halve them if they are very big. Make sure not to over cook them.
  2. In the meanwhile, heat a small frying pan, dry roast all the ingredients mentioned under "to roast and grind". Take care not to burn the ingredients. You can roast each item separately. Cool and grind along with some salt into a powder.
  3. Once the potatoes have cooled, remove the skin and set aside.
  4. Heat a non stick kadai with oil, temper with mustard seeds, once they start spluttering, add the urad dal and fry till they turn golden. Add the curry leaves and the asafoetida powder.
  5. Also add the potatoes, turmeric powder, and salt to taste. Remember we added salt in the spice powder. So add accordingly.
  6. Fry this for few minutes tossing them once in a while. Fry till the potatoes start turning golden brown.
  7. Now add the the spice powder and saute for a minute. 

Remove from heat and serve hot with Sambar and white rice. 


Note:

  1. You can use big potatoes too. pressure cook and cut them into smaller pieces.
  2. Take care not to burn the spices, while roasting, else you will end up having a bitter taste.
  3. Also since we are adding salt in the spice powder, take care while adding salt to the potatoes.

Iyengar Bakery Style Khara Bun

$
0
0


I have beautiful memories of my life in Bangalore. I moved to Bangalore after my marriage and the days spent in there are surely one of the best in my life. 
We used to live in Domlur and right outside our house was one of the Iyengar Bakeries. We were frequent visitors to the Bakery. I used love the goodies he kept. Be it the Aloo Bun, Khaara Bun, Nippatu or the Open Toasts and not to forget the Dilkush. 
So this month when Priya suggested Khaara Buns for the Home Baker's Challenge, I didn't want to miss it. Finally I made it yesterday, me and kids loved it as for DH, he just took a bite and was not very interested as bread is never his cup of tea :)
So if you like bread and that too are a fan of savory bakes, don't miss this. It is easy to put together with very easily available ingredients.


What you'll need
Makes 8 buns
  1. All Purpose Flour - 1.5 cup
  2. Instant Yeast - 1/2 tbsp
  3. Salt - 1 tsp
  4. Sugar - 1.5 tsp
  5. Milk - 1/4 cup
  6. Water - 1/2 cup
  7. Melted Butter - 3 tbsp + 1 tbsp for brushing on top
  1. Onion - 1 medium sized, finely chopped
  2. Green Chilies - 3 to 4, finely chopped
  3. Coriander Leaves - 1/3 cup, finely chopped
  4. Cumin Seeds - 1 tsp
  5. Oil - 1 tsp
Method
  1. Heat a Kadai with oil, temper with cumin seeds. Add the chopped onion and green chilies and saute till the onions turn soft. Add salt and mix well.
  2. Remove from heat. Add the chopped coriander leaves and mix well. Allow to cool.

  3. In a wide bowl, take 1 cup of  all purpose flour, add salt, sugar and the instant yeast. Mix well with hands.
  4. Microwave the milk and water for 30 secs or until lukewarm. It should not be hot.
  5. Now add the milk and water mixture to the flour and mix well. 
  6. Now slowly add the remaining 1/2 cup of flour and knead very well for 5 minutes.
  7. Add the melted butter and knead for another 10 minutes. Add a little more flour if you feel it is very sticky. Knead until you get a soft non sticky dough.
  8. Transfer the dough to a well floured surface and shape it into a rectangle.
  9. Place the onion - green chillies mixture in the middles and cover it from all sides. Now knead well for 5 to 6 minutes or until the onion mixture is well incorporated in the dough. 
  10. Add a little more flour if it is very sticky.
  11. Transfer the kneaded dough to a well greased bowl and keep covered in a warm place for about an hour or until the mixture has doubled in volume.
  12. Punch down the dough and knead again for 3 to 4 minutes. Divide the dough into 8 equal balls and shape them into buns.
  13. Place them on a lined baking tray and allow to rise for another 30 minutes.
  14. Brush the rolls with milk.
  15. Pre-heat the oven at 200C. Reduce the temperature to 180C and bake the buns for 20 to 25 minutes or till done.
  16. Brush with melted butter while bun is still hot to get a nice shine.
Serve warm with a dollop of butter and tea.


Aval Laddu

$
0
0


I am back after a long break. I hope to be more regular with my posts. 
The festival season has begun and so I decided to post a simple recipe apt for Gokulashtami. These laddus are really easy and get ready in no time. A beginner's recipe indeed. Also it requires just a couple of ingredients that can be easily found in your kitchens. 
So if you  are person like me who is not very comfortable with deep frying, then this recipe is for you. Do give this a try

Makes 10 to 11 laddu
What you’ll need
  1. Aval /Poha/Beaten Rice Flakes – 1 cup (thick or thin)
  2. Sugar – ½ cup
  3. Ghee/Clarified Butter – ¼ cup, melted
  4. Green Cardamom/Elaichi – 5 to 6
  5. Cashew nut – 5 to 6, broken into small bits

Method
  1. Dry roast the aval on medium heat until it turns crisp, without burning it. This will take about 4 to 5 minutes. Let it cool for a while.
  2. Powder the sugar along with the cardamom.
  3. Also grind the roasted poha, to a fine powder.
  4. Heat a small frying pan, add a spoon of ghee to it and fry the small bits of cashew nuts, until golden brown.
  5. In a wide mixing bowl, add the powdered aval, powdered sugar and elaichi and the fried cashews along with the ghee. Mix well with hands.
  6. Heat the remaining ghee and add it to the above mixture. Mix well.
  7. Shape into small balls, when making the balls, press tightly in the beginning and then give proper shape.


Note:
  1. Make sure ghee is hot, else u may not be able to make the balls.
  2. If making in larger quantities, divide the powdered mixture into smaller portions and add ghee and form balls.
  3. Press tight in the beginning while making balls.


Gokulashtami Recipes | Krishna Jayanthi Recipes

$
0
0


Gokulashtami or Sri Krishna Jayanthi - the birth of Lord Krishna, this year falls on September 5th, 2015. Krishna Jayanthi is celebrated with great fervor across India. A variety of sweets and savories are prepared to celebrate the birth of Krishna.
My MIL says that for Gokulashtami and Diwali, we should keep the "Ennai Chatti" meaning some savory should be fried in the house.
So here is a list of traditional recipes usually made on Gokulashtami.

Uppu Cheedai

Vella Cheedai

Thenkuzhal

Thattai

Rava Laddu

Aval Kesari

Aval Laddu

Nei Appam

Vella Aval


Muthusaram|Mullu Murukku - Gokulashtami Recipes

$
0
0


Mullu Murukku or Muthusaram as it is called in the Palakkad Iyer community, is a popular savory prepared on festive occassions. It is one of the items in the "Cheeru"/Seeru, in a wedding. It is one of my favorite snack varieties. But somehow, it makes an appearance very rarely in my kitchen. Most of the times, I end up preparing either the thenkuzhal or ribbon pakodam as these are better liked by the family.
This time I wanted to try this and got the recipe from my mother. They turned out very well and were loved by all at home. 


What you’ll need
  1. Rice Flour – 3 cups
  2. Channa Dal/ Kadala Paruppu – 1/2 cup
  3. Moong Dal/ Pasi Paruppu – 1/2 cup


The following measurements are for 1 cup of riceflour + dal flour
  1. Butter – 1 tbsp
  2. Asafoetida – a generous pinch
  3. Salt to taste
  4. Oil to deep fry

Method
  1. Dry roast the dals separately, until a nice aroma come out. Don’t over fry.
  2. Grind the dals into a fine powder. Sieve both the powders to get a fine powder. It is important to sieve the flour. Mix both the flours well and keep aside.
  3. For every 3 cups of rice flour use 1 cup of the mixed dal powder.
  4. Now take 1 cup at a time of this rice flour and dal flour mixture in a wide bowl.
  5. Add the butter, asafoetida and salt to taste. Mix well with hands.
  6. Add water little by little and make into soft dough. Don’t make it too loose or too stiff.
  7. Heat oil in a Kadai to deep fry.
  8. Take the murukku press and place either the single star plate.
  9. Place the dough in the murukku press and squeeze into spirals, on a plastic sheet or on the back of a flat ladle
  10. Carefully, transfer the murukku from the plastic sheet into your hands and slide into the oil. If squeezed on a ladle, then slowly slide it into the oil.
  11. Fry on medium flame, until the bubbles stop.
  12. Transfer into a kitchen tissue, cool and store in air tight container.
Note:
  1. Don't over fry the dals.
  2. If using store bought rice flour then use only 2 cups of rice flour for 1 cup of dal flour.
  3. Add the mentioned amount of butter or use hot oil, else, the muthusaram will turn hard. 
  4. If you feel muthusaram is hard, add more butter or oil, in the next batch.
  5. Knead 1 cup of dough at a time, else the muthusarams will become very red.
  6. The quality of rice flour is also important to get crunchy muthusaram. Homemade rice flour is recommended. 


Fried Modakam

$
0
0

Vinayaka Chaturthi/Ganesh Chaturthi is just around the corner. Ganesha Chaturthi is one of my favourite festivals. Kozhukattais/Modakams are the most important neivdyam or offering prepared on this occasion. My favourite ones being the traditional thengai Poorna Kozhukattai and the Ulundu Kozhukattai.

Usually, my mother prepares only these 2 varieties of kozhukattais but my MIL prepares a variety of offerings like Brown channa Sundal, Chakkara Pongal, Paccha Arisi Idly, Nei Appam, Vadai and the kozhukattais of course.

The fried Modakams are also a very popular offering. These are usually prepared for Ganapati Homam. I had been wanting to try out these for a long time and finally made them a couple of days back. They turned out very nice.

I have also posted few other kozhukattais with different fillings. So this chaturthi, do try out one of these kozhukattais.


What you’ll need
For outer covering
  1. All Purpose Flour/Maida – ½ cup
  2. Semolina/Rava – ½ tbsp
  3. Ghee – 1 tsp
  4. Salt – a pinch
  5. Water to knead

For the filling
  1. Fresh Scraped Coconut – ¾ cup
  2. Powdered Jaggery – ¾ cup
  3. Cardamom – 4 to 5, powdered
  4. Ghee – 1 tsp


Oil to deep fry

Method
  1. In a wide bowl, add the maida, rava, pinch of salt, and mix well.
  2. Add the ghee and rub well with fingers.
  3. Now add water little at a time and knead into a stiff dough. Slightly stiffer than the regular chappati dough.
  4. Cover and keep aside for at least 30 mins.

For the filling,
  1. Heat a kadai, and add the powdered jaggery with ¼ cup of water.
  2. Once the jaggery is dissolved, strain for impurities and pour back the jaggery water into the same kadai.
  3. Now let this come to a rolling boil, now add the scraped coconut and keep stirring.
  4. Cook until it has thickened well and the mixture starts leaving the sides of the kadai. Wet your hands and take a small portion of the mixture, you should be able to form a ball easily.
  5. Add the cardamom powder and ghee and mix well.
  6. Remove from heat. Transfer to another plate.
  7. Once the mixture is warm, grease your hands lightly and form small marble sized balls and keep aside.

To make the modakams
  1. Roll out the dough on a lightly floured surface, into a thin disk, cut out small circles with a sharp lid.
  2. Place one of the coconut balls, in the centre of the small cut out circle, gather all the edges and seal tightly.
  3. Repeat with others. Make sure to seal the edges tightly else, the filling make come out and spoil the oil.
  4. Heat oil for deep frying, let it be hot but now smoking hot.
  5. Drop the modakams a few at a time and fry on medium heat until the outer covering turns golden.
  6. Drain on to a tissue paper. Delicious modakams are ready.


Note:
  1. Make sure to seal the edges very tight, else the modakam might open and the filling will come out and spoil the oil.
  2. Also make sure the filling is not very moist or watery, this will also result in leaky modakams.


Paruppu Kanji|Payatham Paruppu Kanji|Fasting Recipes

$
0
0

In our house we observe monthly fasts for Ekadashi. I have been observing the fast for a few years now. This Kanji is usually prepared on fasting days, especially on Shivarathri. My mother and MIL both prepare this kanji for Ekadashis too. This is very much like the paruppu payasam, except that since it is a kanji, we avoid adding cardamom and roasted cashewnuts.

There is another variation to this kanji, which is prepared by adding both Broken wheat or Godhumai Ravai and Pasi Paruppu. That also tastes very good.

Makes 3 to 4 cups

What you’ll need
  1. Split Moong Dal/Payatham paruppu/Pasi Paruppu – ¾ cup
  2. Powdered Jaggery – ¾ cup
  3. Milk – 2.5 to 3 cup
Method
  1. Heat a Kadai, and dry roast the dal until it starts changing color and a nice aroma starts coming.
  2. Transfer it to a vessel, add just enough water, the water level needs to be just above the dal and pressure cook it for 3 whistles or until the dal is very soft. You could also cook it in a vessel by adding water and boiling.
  3. In the meanwhile,  heat a kadai, add the powdered jaggery with ½ cup of water, once the jaggery is dissolved, strain for impurities and pour it back into the kadai.
  4. When the jaggery syrup starts boiling, add the cooked and mashed dal and let it boil for another 3 to 4 minutes.
  5. Remove from heat and add the milk, mix well.
That’s it, paruppu kanji is ready.


Note:
Usually when made on fasting days, no cardamom or cashewnuts are added, but you can add if you like.
Also, make sure not to add too much water while cooking the dal, else the kanji will become very water.
Don't add the milk and boil in jaggery syrup, it may split.


Samai Arisi Upma Kozhukattai | Little Millet Kozhukattai

$
0
0

Millets are becoming very popular now and many are replacing rice with millets. Millets are said to protect your heart health, lower type II diabetes, lowers risk of cancer, boosts respiratory health, improves your immune system etc.

I have been trying out recipes using different millets for sometime now. Millets can easily replace the rice in most of the recipes like pongal, upma, kozhukattai, idly, dosai etc. So here is my first post using millets. Hope to post a few more soon.

For this Kozhukattai, I have followed the same procedure as my upma Kozhukattai. The only thing is it requires a little more water to cook than the rice rava. Also, I find making kozhukattai with millets easier, as they are already very tiny and in the rava form. So no need to make rava.


Makes around 30 medium sized Kozhukattais
What you'll need
  1. Samai/Little Millet – 2 cup
  2. Scraped Fresh/frozen coconut – 1 cup
  3. Salt to taste
  4. Green Chillies – 3 to 4
  5. Curry Leaves – few sprigs

For tempering
  1. Coconut Oil – 1.5 tbsp
  2. Mustard Seeds – 1 tsp
  3. Channa Dal/Kadala Paruppu – 1 tbsp
  4. Urad dal/Ulutham Paruppu – 2 tsp
  5. Asafoetida/Hing – a generous pinch

Method
  1. Wash and carefully drain the samai/little millet and set aside.
  2. Heat a Kadai with oil, temper with mustard seeds, once they splutter, add the channa dal and urad dal and fry until the dals turn golden.
  3. Add the chopped green chillies, curry leaves and hing, mix well.
  4. Now add 6 cups of water. Also add the scraped coconut and salt to taste. Bring this to a rolling boil.
  5. Now add the little millet and mix well. Cook covered in low heat for 5 to 8 minutes or until the water is absorbed and the mixture resembles upma. Keep stirring once in a while.
  6. Transfer to a plate and let it and let it cool down a little.
  7. Wet you palms, and form golf ball sized balls or oval shape
  8. Place on a steamer or idly plate. Repeat with remaining mixture.
  9. Steam cook for 10 minutes.
Serve warm with coconut chutney or Sambar.


Note:
  1. The mixture should not become too crumbly, then you will not be able to form balls.
  2. Don’t let the mixture cool too much, make the balls when warm.
  3. You could dry roast about 1/4 cup of Tuar dal and powder it along with red chillies and add it while the water is boiling along with the coconut. This also gives a good taste.

Vella Payaru Sundal/Black Eyed Peas/Lobia Sundal - Easy Navarathri Sundal Recipes

$
0
0


Navarthri is starting tomorrow. We usually keep a nice golu every year, but this year, with our move from Chennai to Pune, we had to leave behind most of our dolls in Chennai and hence we won’t be able to keep a grand golu. But I plan to keep at least a couple of dolls.
Navarathris are usually very busy. We never know when it started, and when the 10 days got over. Everyday an offering or neyvedhyam of Sundal or some payasam is prepared. Making sundal is very easy, except that you have to remember to soak the legumes the previous day night.
There are some legumes, that get cooked easily without much of prior soaking, like the Karamani, Pacha Payaru, Peanuts, Kadala Paruppu, Pasi Paruppu etc. This Lobia also does not require any soaking. But I like to soak it for just about 30 minutes. The lobia sundal is one of the very tasty ones and is loved by all in our house.

What you'll need

  1. Vella Payaru/Black Eyed Peas/Lobia – ½ cup
  2. Green Chillies – 2
  3. Ginger – 1 inch piece
  4. Fresh Scraped Coconut – ½ cup
  5. Asafoetida – a generous pinch
  6. Curry Leaves – few
  7. Salt to taste
For Tempering

  1. Coconut oil – 2 tsp
  2. Mustard Seeds – ½ tsp
  3. Urad Dal – ½ tsp
Method

  1. Soak the Vella Payaru for ½ an hour.
  2. Pressure cook the payaru with just in enough water for 3- 4 whistles.
  3. Once the pressure is released, drain the water from the payaru. And set aside.
  4. In the meanwhile, grind green chillies, ginger, curry leaves and half of the mentioned coconut. Just enough to crush everything, don’t add water.
  5. Heat a Kadai with oil, add mustard seeds, once it splutters add urad dal and fry till it turns golden, now add the curry leaves and asafoetida.
  6. Then add the cooked payaru, salt to taste and the ground chilly coconut mixture.
  7. Mix well and fry for 2 to 3 minutes.
  8. Next add the remaining scraped coconut and fry for another couple of minutes.
  9. Sundal is ready.


Kai Murukku - Diwali Snacks

$
0
0

Kai Murukku is a very tasty snack and is a favourite in our house. My MIL makes it really well and we all love it. She makes it a point to prepare these for every Gokulashtami. I am still learning to make the perfect murukkus.
In today’s world, where all are looking for shortcuts, the art of making this handmade murukku is getting lost. Most of us resort to the murukku press. But the texture and taste of these handmade murukkus are very different and the best. You may not get the perfect shape at the first go itself, but I am sure, with practice we all can master the art of making murukku. I have shared small video clip of how to twist the murukku and given all the possible tips and tricks. This is the first time I am uploading a video, so please bear with the quality. Please read the notes section too.


What you'll need
  1. Homemade Rice Flour – 2 cup
  2. Urad Dal Flour – ¼ cup
  3. Cumin Seeds – 1 tsp
  4. Hing/Asafoetida – generous pinch
  5. Butter – ½ tbsp
  6. Salt to taste
  7. Coconut Oil to deep fry


Method
To prepare rice flour
Wash and soak the rice for 2 to 3 hours. Drain well, now grind to a fine powder in small batches and sieve it.
Put back the coarse remains and grind again, sieve again.
To prepare urad dal flour,
Dry roast the urad dal until a good aroma comes, cool and grind to a fine powder, sieve and keep ready.


  1. In a wide bowl, take the rice flour, urad dal flour, cumin seeds, hing and salt mix well.  Also add the butter and mix well so that butter is incorporated in the flours.
  2. Now add water little by little and knead into a smooth, pliable dough, without any cracks. Don’t make it very loose. Keep the dough covered to avoid drying.
  3. Heat a Kadai with oil, for deep frying.
  4. Keep a cup of water and a little oil in another plate for greasing.
  5. Spread a clean white thin towel, place a small bottle lid on the towel, take a small lemon sized ball, elongate one side of the dough into a medium sized thread and start twisting it around the lid. Refer video for detailed view.
  6. Make around 8 to 10 murukkus in the same way as above.  Grease you fingers with oil if the dough is sticky.
  7. By this time, the murukku we made first would have dried a little, gently the murukku from the cloth and slide into the oil. Fry 2 to 3 murukkus at a time on a low flame, until the bubbles have almost stopped.
  8. Drain on a tissue paper, cool and store in air tight container.


Check this video 


Note:

  1. Use the maavu arisi, for making the rice flour.
  2. Using homemade, fresh rice flour/eera podi is very important. Else the murukkus will get cut when you try to swirl also, they will get very red when you fry.
  3. My MIL, always uses coconut oil to deep fry, but u can also use refined oil.
  4. You can sesame seeds also to the dough.
  5. Instead of butter, you can add hot oil also while preparing the dough.
  6. Always keep the dough covered, else it will dry up and preparing murukku will be difficult. In case the dough starts cutting while twisting, sprinkle some water and knead again, grease your fingers with oil.
  7. Rest the murukku on the towel for atleast 10 minutes before frying.


Easy Diwali Recipes - Diwali Sweet /Diwali Snacks

Carrot Burfi - Easy Diwali Sweets

$
0
0

Diwali is almost here. People would be busy shopping for new clothes. Deciding what sweets and snacks to prepare. My mother usually starts deciding a week ahead as to what sweets and snacks to prepare. She will meticulously plan and prepare a good variety. Of course I have not taken to her, I am very lazy and always look for a easy way out. 
If you are looking for a easy sweet yet, delicious and also gives good quantity, then this one is for you. It is really simple with very basic ingredients and gives a good number of pieces. I learnt this from my aunt, who makes awesome sweets. I had been wanting to post it last Diwali itself, but blame it on my laziness, it took a full year for this to appear on the blog.


What you'll need
  1. Grated Carrot - 1 cup, tightly packed
  2. Cashew Nuts - 1 cup
  3. Besan/Kadalai Maavu - 1 cup
  4. Coconut - 1 cup
  5. Ghee - 1 cup
  6. Milk - 1 cup
  7. Sugar - 3 cup
Method
  1. Grease a plate lightly with ghee and set aside.
  2. Grind the cashewnuts along with grated carrots, coconut and milk.
  3. Heat a heavy bottomed kadai, add the ghee, once it starts heating up add the kadalai maavu and fry for 3 to 4 minute
  4. Now add the sugar and the ground paste and start stirring on low to medium heat.
  5. Keep stirring taking care not to burn the contents, you will see some bubbles on the sides
  6. After about 10 to 15 minutes, the whole mixture will start leaving the sides and become as a whole mass like a ball
  7. At this stage, quickly, transfer to the greased plate and smoothen the top with a greased flat bottomed cup (davara).
  8. Let it cool for a couple of minutes, and then mark the pieces.
  9. Let it cool completely before removing the pieces.
Note:
  1. If you feel the burfis are not setting properly on cooling, put back the whole thing in the kadai and stir for some more time.


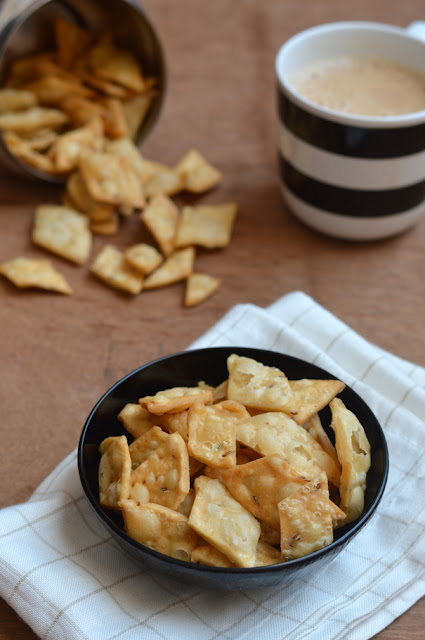
Savory Diamond Cuts/Maida Biscuits

$
0
0


Diamond Cuts or Maida Biscuits as we call it at home are my childhood favourite. Not one Diwali goes by where my mom doesn’t make these. These biscuits can be made sweet or savory. As my kids prefer savory stuff more than sweets, I prefer to make these. My MIL makes the sweet ones to add in the mixture. I like both the versions. I will post the sweet version later.

These biscuits are very easy to make and get ready in no time. A perfect snack to try for beginners. And you really need no occasion to make these. They are perfect to much along with your cup of coffee or tea on a nice rainy day.

Even though, it is very simple to make, there are certain things to keep in mind, else you might end up with not so crisp biscuits. Please read the recipe and the notes. The dough I have given is a basic dough and you can use your imagination to bring out many variations to this.

Makes about 2 cups
What you’ll need
  1. Maida/All Purpose Flour – 1 cup
  2. Hot Oil – 1.5 tbsp
  3. Cumin seeds – 1 tsp
  4. Chilly Powder – 1 tsp
  5. Salt to taste
  6. Oil to deep fry
Method
  1. In a wide bowl, add the maida, salt, chilly powder, cumin seeds and mix well.
  2. Now add the hot oil and mix it well with your hands so that the oil is incorporated very well in the flour.
  3. Now sprinkle water little by little and knead into a smooth, pliable yet firm dough. If the dough is loose, the biscuits will turn out soggy.
  4. Add a few drops of oil on the dough and knead again for 3 to 4 minutes.
  5. Cover the dough and rest it at least for 20 minutes. Resting helps in making the dough more pliable.
  6. After the resting time, knead the dough again for a couple of minutes and then divide them into lemon sized balls.
  7. Heat oil in a Kadai for deep frying.
  8. Take one of the balls and roll out into a thin circle like chappati, grease your rolling pin with few drops of oil, for easy rolling.
  9. Poke holes with a fork on the chappathi to prevent puffing up.
  10. Now, with a sharp knife or pizza cutter, cut vertical strips and then again cut it diagonally, to result in diamond shaped pieces. Separate the pieces
  11. Once the oil is hot, reduce heat to low and add diamond cuts in small batches to the hot oil, fry on medium flame, until the bubbles stop. Don’t fry in high flame, frying in medium flame is important to get crispy biscuits.
  12. Drain on tissue paper, once it has cooled, store in air tight container. Repeat the same with remaining dough.

Enjoy with a cup of coffee!


Notes:
  1. You could add Omam or ajwain to the dough.
  2. You could also grind some dry red chillies and garlic and add it to the dough, if you like the garlic flavour.
  3. Be very careful while adding water to knead the dough. Adding more water, will make the dough sticky and the biscuits will be soggy.
  4. Also add the mentioned amount of hot oil which gives the crunchiness to the buiscits.
  5. You could had melted ghee or butter too.
  6. Don't make the chappathis too thin.


Coconut Milk Burfi - Easy Diwali Sweets/ Easy Diwali Recipes

$
0
0


Here is another simple and easy sweet recipe. While I was talking to my mother the other day, asking her to give me some easy recipes to try out for Diwali. She started suggesting, badhusha, badam halwa, Mysore Pak. These were some of the sweets which my mother makes expertly and learnt it from my grandfather. But I was really not in mood to try out these sweets and asked to suggest some easy burfi/cake. She went through her book and found this one. She assured me that I couldn’t go wrong with it. So I decided to try it out.

As soon as I added all ingredients and started heating up, everything became liquid as expected. It did require quite a bit of stirring but finally the result was very good. I was very worried if it would turn out well. All the while I was stirring I was chatting with S and with S’s assurance, and encouragement the sweet did turn out well. Thanks S for being there all the while.


I halved the recipe and got about 20 pieces.

What you’ll need
  1. Milk – 4 cup
  2. Fresh Scraped Coconut – 2 cup
  3. Sugar – 3 cup
  4. Ghee – 1 cup

Method
  1. Grease a tray and a flat bottomed cup (davara).
  2. Add all the ingredients in a heavy bottomed Kadai.
  3. Keep on medium heat and stir once in a while.
  4. Once it starts getting slightly thick, then lower heat and stir continuously.
  5. First you will see bubbles on the sides, keep stirring.
  6. Next the mixture will slowly start leaving the sides.
  7. And finally, the whole thing will come together, getting frothy.
  8. Pour immediately in a greased tray and flatten/smoothen with the greased cup.
  9. Allow to cool for couple of minutes and then with a greased knife mark the pieces.

Cool completely and remove the pieces. Store in a cool dry container.


Note:
  1. You could add some cardamom powder for flavour if you like, but I prefer the ghee smell so did not add.
  2. Even if you miss the stage and the mixture turns crumbly, add some more milk and stir for a couple of minutes and pour into the greased tray.
  3. If you remove earlier then put it back in the kadai and stir for some more time. Stir until it turns frothy.


Puli Upma/ Podi Arisi Upma

$
0
0

Are you looking for a easy no fuss recipe for breakfast or dinner, then this Puli Arisi Upma is for you. It is very easy and gets ready in no time. Earlier I used to prepare arisi upma without puli/tamarind. But recently, my mother told me about this version with tamarind. All at home seem to like this version with tamarind better. It has become my go to dish and is definitely a saviour on days when I have no idly/dosa batter.

The main ingredient is for this is the broken rice. Broken rice is easily available in stores. If you cannot lay your hands on broken rice in the city you live, then just pulse your regular rice in the mixie until coarse rava consistency. Sieve it and use the rava. Do sieve it else, the upma will turn sticky and mushy.


What you’ll need
  1. Broken Rice/Noi Arisi – 1 cup
  2. Tamarind – small gooseberry size
  3. Water – 2.5 cup
  4. Green Chillies – 3 to 4, slit
  5. Turmeric Powder – ¼ tsp
  6. Sambar Powder – 2 tsp (optional)
  7. Jaggery – little (optional)
  8. Asafoetida – ¼ tsp
  9. Salt to taste

For tempering
  1. Gingely Oil/Nalla Ennai – 2 tbsp
  2. Mustard Seeds – 1 tsp
  3. Channa Dal/Kadala Paruppu – ½ tbsp
  4. Urad Dal – ½ tbsp
  5. Dried Red Chilly – 2, broken
  6. Curry Leaves – 2 to 3 sprigs

Method
  1. Soak the tamarind in 1 cup of water. Squeeze and extract the juice.
  2. Heat a pressure pan or small pressure cooker, add oil, once it heats up, add the mustard seeds, once it starts spluttering, add the channa dal and urad dal and fry till the dals turn golden. Now add the red chillies, for couple of seconds then add the slit green chillies and curry leaves.
  3. Next add the tamarind extract and add another 1.5 cup of water (totally 2.5 cups of water including the tamarind extract)
  4. Add the asafoetida, Sambar powder, turmeric powder and salt to taste. Let this come to a boil.
  5. Then add the washed broken rice/noi arisi, add little jaggery. Stir well. Taste the water at this point and check for salt if required.
  6. Close the cooker lid and put on the weight. Cook for 3 whistles and then keep in low flame for 3 to 4 mins. Turn off heat.
  7. Let the pressure subside naturally, open the cooker and fluff the upma well.
  8. Serve hot. I like it with sugar. You can have it with coconut chutney or curd too.


Notes:
If you don't have broken rice, you can run the rice in the mixie till coarse rava consistency, sieve and it and keep aside the fine flour and use only the coarse rice rava.


Milagu Jeeraga Adai/Karthigai Adai

$
0
0


Adai is a one of the favorite tiffin items at home. Especially with a combination of either Moru Kootan/Kuzhambu or Aviyal, though personally I prefer to have with Aavakkai pickle. Ususally adai is made with a combination of lentils like tuar dal, channa dal and urad dal along with rice and red chillies. Every household has its own proportions for adai.

For Karthigai, my mother prepares a special adai using only whole skinned urad dal (black urad dal), rice black pepper, cumin seeds and coconut pieces. The flavor of pepper, cumin and curry leaves and the bite of the coconut pieces gives this adai a wonderful flavor.  Also for Neivedyam only pacha arisi is used, so if making for neivedyam use pacha arisi but on other days you could substitute with boiled rice/idly rice.

What you’ll need
  1. Pacha Arisi/Raw Rice – 2 cup
  2. Black Urad Dal – ¾ cup
  3. Coconut, cut into small pieces – ½ cup
  4. Black Pepper – 1.5 tbsp
  5. Cumin Seeds – 1 tbsp
  6. Curry Leaves – 5 to 6 sprigs
  7. Salt to taste
  8. Oil for preparing adai

Method
  1. Wash and soak the rice for 2 to 3 hours. No need to soak the urad dal. Wash dal and keep aside.
  2. Add the rice and dal in a mixie jar in batches along with black pepper and cumin seeds by adding water and salt as required. Grind coarsely. You can grind in the grinder also.
  3. Rest the batter for couple of hours. This is not compulsory, but I prefer to rest the batter.
  4. Before preparing the adai, add finely chopped fresh curry leaves and chopped coconut bits to the batter. Add more water to the batter if required.
  5. Heat an iron tava, pour a ladle full of batter and spread it from center outwards like a dosa, but slightly thicker, make a small hole with the back of the spatula in the center of adai.
  6. Drizzle oil along the sides and in the middle of the adai. Cook on medium heat until the sides start turn brown, flip and cook the other side. Drizzle some more oil. Cook according to your liking, if you want it crisp cook for longer time on medium heat.

Serve hot with butter and jaggery or moru kootan/aviyal/sambar.


Notes:
  1. Usually we don't soak the urad dal for this adai, but if you are not comfortable in grinding without soaking, soak the dal for about 10 to 15 mins.
  2. Since we use pacha arisi, this will turn hard if gets cold, so eat hot.
  3. If not making for neivedyam, you can substitute pacha arisi with idly/rice.
  4. The main flavor is from pepper and cumin, so I don’t use asafetida for this adai, but you can add if you like.


Varagu Arisi Dosai/Kodo Millet Dosai - Easy Millet Recipes

$
0
0

My experiments with millets continues. This time I tried Dosai using Varagu Arisi also called Kodo Millet in English. I have used the same proportions as for the regular idly/dosa. The Dosas turned out very crisp and delicious. The taste is similar to the regular rice dosas. You will not miss the taste of the regular dosa. I used my mixie to grind the batter as it was a small quantity. Use your wet grinder if grinding in larger quantities. You can also make idlis with the same batter. The idlis also turned out very soft.
If you are looking to replace rice in your diet, millets are a great option. They have numerous health benefits. Do try this healthy dosai.


Makes around 20 dosas
What you'll need
  1. Varagu Arisi – 2 cup
  2. Urad Dal – ½ cup
  3. Methi Seeds/Vendhyam – ½ tsp
  4. Salt to taste

Method
  1. Wash and rinse the varagu carefully and soak along with methi seeds for 3 to 4 hours.
  2. Wash and rinse the urad dal and soak for 30 mins.
  3. Drain urad dal and grind to a smooth and fluffy batter adding water as required.
  4. Grind the varagu also to a fine paste.
  5. Mix  both urad dal and varagu batter together, add required salt and mix with hands.
  6. Allow to ferment for 8 hours.
  7. Heat a tava, pour a ladle full of batter and spread like a regular dosa from inside out in a circular motion.
  8. Drizzle some oil around the edges, cook for a minute on medium heat, flip over, drizzle a little oil and cook till crisp.

Serve hot along with sambar and chutney of your choice.


Kasi Halwa/Poosnikai Halwa

$
0
0

Wish you all a very Happy New Year - 2016!


The past year I was not very regular with my blog. This year I hope I can spend more time on the blog and post more regularly. So here is the first post of the year. Starting the New Year on a sweet note :)

The Kasi Halwa was a signature dish of my grandfather. I really don’t what took me so long to post this dish. After my grandfather, this dish has not been made much in our household. And I used to taste it once in a while in marriages or family functions. It is one of my favorite sweets and very easy to make, the only hard work being grating the ash gourd.

I have seen my grandfather tie the grated ashgourd in a white cloth and squeeze it very well to remove all the juices. He used to make in large quantities and hence it is required to squeeze out all the excess water. Since mine was a very small gourd and I had only 2 cups of grated vegetable, I just squeezed it lightly with my hands. If you squeeze it, it will take less time for the moisture to evaporate.

Serves 3 to 4
What you’ll need
  1. Ashgourd/Elavan/Vella Poosnikai – 2 cup, grated and lightly squeezed
  2. Sugar – ¾ cup
  3. Ghee – 4 tbsp
  4. Cardamom – 6 pods
  5. Saffron – few strands (optional)
  6. Cashew nuts – few
  7. Yellow or Orange food color – a pinch

Method
  1. Peel the ashgourd and remove the seeds and soft white middle portion.
  2. Grate the ashgourd. Lightly squeeze the grated ash gourd and measure it. Save the liquid.
  3. Heat a heavy bottomed pan, with a tbsp of ghee, fry the cashews until golden and keep the cashew aside.
  4. Add the grated ash gourd to the heavy bottomed pan and sauté for a couple of minutes. Add a little of the reserved liquid and cook covered on medium heat until the ash gourd is soft and tender. Takes anywhere between 10 to 15 minutes. Keep stirring once in a while for even cooking and to avoid burning. Make sure that most or all of the moisture is absorbed.
  5. Add the sugar after the ash gourd is cooked completely. Once sugar is added, the mixture will turn watery. Also add the food color and saffron strands at this stage and keep stirring on medium heat.
  6. Add the remaining ghee little by little and stir until the mixture starts leaving the sides of the pan.
  7. Remove from heat. Add the cardamom powder and fried cashew nuts.
  8. Delicious kasi halwa is ready. Serve warm.

Note:
  1. If the grated vegetable has a lot of water content then squeeze well to reduce cooking time.
  2. Cook on medium to low heat throughout.
  3. This can be refrigerated for 3 to 4 days. Heat on a vessel of water before serving.


Viewing all 86 articles
Browse latest View live